

We are so excited to partner with Salesforce because their releases help you, too! The Spring '25 release for Salesforce is currently rolling out, and below are some of the key enhancements we want to highlight as your Salesforce partner.
The Release Date for Spring '25 will depend on the instance of Salesforce, but the main release weekends are on:
-
January 11, 2025
-
February 8, 2025
-
February 14, 2025
If you already know the instance your production Org is located on, you can head over to Trust Status, click on your instance name, and hit “Maintenance”. This will show you the date of the Salesforce Spring '25 release hitting your Org. If you don’t know your instance, go to Setup > Company Information.
General Enhancements
Verify Your Return Email Address for Sender Verification
After Spring ’25, to comply with increased email security standards, you’re required to verify the Email Address in My Email Settings.
When: Salesforce enforces this update in Spring '25. To get the major release upgrade date for your instance, go to Trust Status, search for your instance, and click the maintenance tab.
Why: A verified email address is used to send emails from your account. This update allows increased accountability and security for email deliverability.
How: To comply with increased email security standards, emails fail to send from the return email address in My Email Settings until the address is verified. Instruct all users to visit their My Email Settings. Users can manually verify their email addresses by selecting Resend Verification Email and clicking the link in the email. If the resend option is unavailable, the return address is already verified. Users receive a verification email once per release until Spring ’25. The email includes the verification link.
Track Salesforce Platform Login License Overages in Your Org
You can keep track of Salesforce Platform Login users who exceed the number of custom objects that they’re allowed on the System Overview page. Click the number next to Salesforce Platform Login Users Over Custom Object Limit to download a CSV file of the user names and the custom objects that they created.
Where: This change applies to Enterprise, Performance, Unlimited, and Developer editions.
Get Personalized Suggestions in Setup
Get relevant suggestions just for you, right where you work in Setup. Suggested for You makes personalized recommendations based on the products you have and how you and others in your company work.
Where: This change applies to Lightning Experience in all editions except Essentials.
Why: When you see a suggested action you’d like to take, click the action button. Use the copy button to save the content for later. You can manage suggestion preferences in Adoption Assistance in Setup. You can also dismiss an individual suggestion if you don’t want to see it again.
Find the full list of updates here - General Enhancements
General Setup
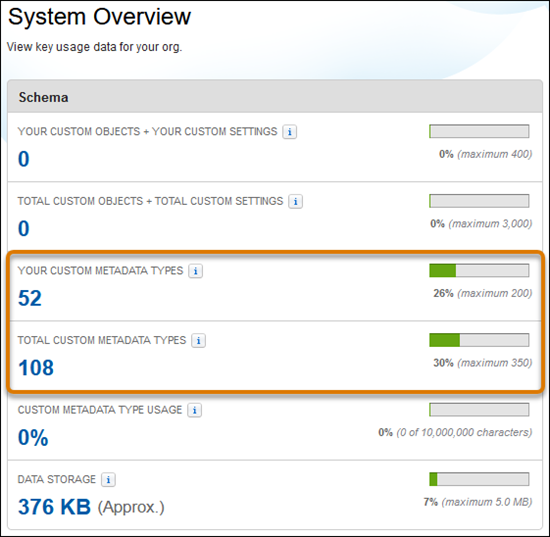
Better Understand Your Custom Metadata Type Usage
The System Overview page now shows you custom metadata type usage in two categories instead of one. The Your Custom Metadata Types category shows the number of custom metadata types that originate from anywhere other than a certified managed package. The Total Custom Metadata Types category shows the total number of custom metadata types, including those that were installed from a certified managed package.
Where: This change applies to Lightning Experience and all versions of the mobile app in all editions, except Personal Edition.
How: From Setup, in the Quick Find box, enter System Overview, and then select System Overview.
Find the full list of updates here - General Setup
List Views
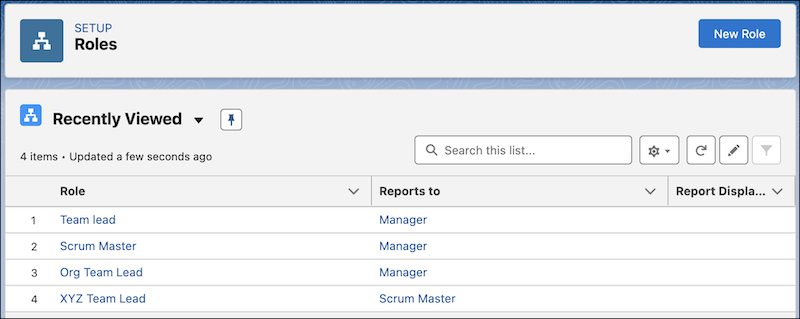
Get Improved Performance with the Enhanced Role List View
With a new user experience, you can view, sort, and filter user roles in a list format and edit roles inline. This enhancement makes it easier to manage role-based access control so that users see the data that they need.
How: From Setup, in the Quick Find box, enter Users, and then select User Management Settings. Enable Enhanced Role List View. To view the enhanced page, go to the Roles Setup page.
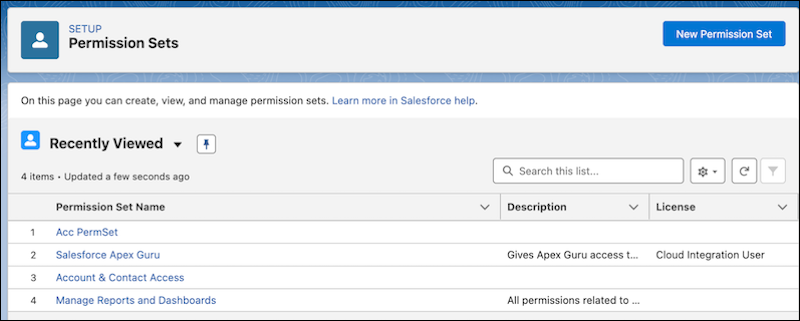
Manage Permissions Sets with the Enhanced List View
This revamped user experience provides streamlined navigation, improved filtering options, search capabilities, and a more intuitive layout. This enhancement makes it easier to manage and navigate through permission sets. Key improvements include advanced filtering options, a more organized layout, and quicker access to critical actions.
How: From Setup, in the Quick Find box, enter Users, and then select User Management Settings. Enable Enhanced Permission Set List View. To view the enhanced page, go to the Permissions Sets Setup page.
Sort List Views by Multiple Columns
To see your data in a more intuitive way and to make your list views more actionable, you can now sort list views on object home pages by up to five columns. Select the columns to sort by and whether to sort each column in ascending or descending order. To return to sorting by a single column, click a column header that isn’t included in your multiple column sort. Sorting by multiple columns affects only your user preferences, and you can’t save your multi-column sorting configuration as a default. We delivered this feature thanks to your ideas on IdeaExchange.
When: Sort list views by multiple columns is generally available on a rolling basis starting in Spring ’25.
How: To sort a list view by multiple columns, from a list view, click Sort by Multiple Columns, and then select the columns to include in the sort. Click Apply.
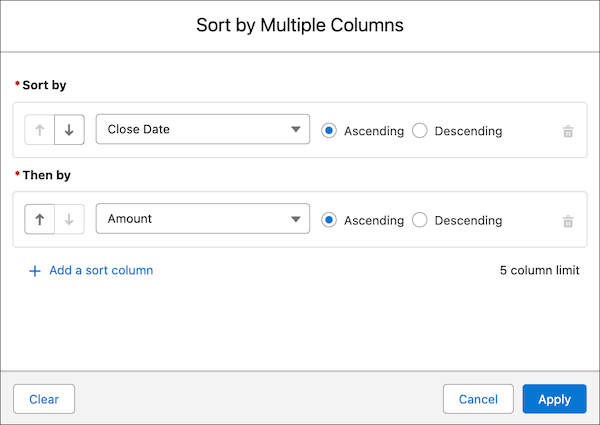
For example, create a Cases list view that’s sorted by Contact Name, then by Priority, and then by Date/Time Opened. Or you can create an Opportunities list view sorted by Close Date and then by Amount.
Your list sort configuration is saved until you modify or clear it.
Organize Your Data with Multi-Column Sorting for Related Lists
To organize and understand your data better, sort related lists by up to five columns. Quickly identify patterns and trends so that you can make informed decisions. Previously, you could sort a related list by only a single column. We delivered this feature thanks to your ideas on IdeaExchange.
How: To sort by multiple columns, from a related list, click View All, and then click Sort by Multiple Columns. Select the columns to include in the sort, and then click Apply.
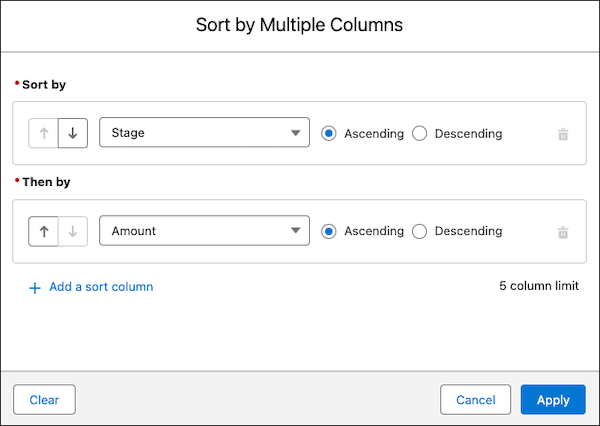
For example, let’s say that you have an Opportunities related list on the Account page. Sort the Opportunities related list by Stage and then by Amount.

Your list sort configuration is saved until you modify or clear it.
Sort by multiple columns affects only your user preferences. You can’t save your multi-column sorting configuration as a default.
Edit List Filters Option Is No Longer Available
The Edit List Filters option in List Views Control is removed from all list views. To edit your list view filters, click the Filters icon. Previously, the Edit List Filters option was unavailable only for list views rendered with Lightning Web Components (LWC).
View and Filter on More Fields in the Enhanced User List View
You can now work with user list views more effectively with new added fields. Add the Delegated Approver, End of Day, Is Partner, Start of Day, User Verified Email, User Verified Mobile Number and Password Expiration Date fields to your user list views. Then sort, filter, search, and edit your user records using these fields
How: From Setup, in the Quick Find box, enter Users, and then select User Management Settings. Enable Enhanced User List View. To view the enhanced page, from Setup, go to the Users page. To change and reorder the columns displayed in a list view, select Select Fields to Display.
Find the full list of updates here - List Views
Permissions
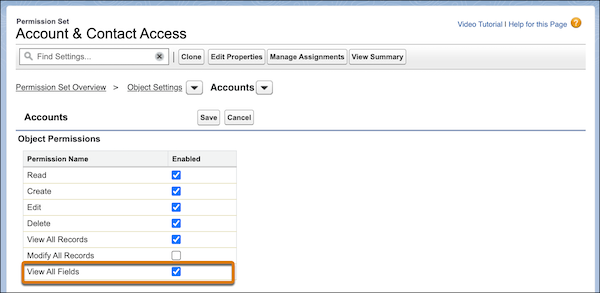
Allow Users to View All Fields for a Specified Object
It’s easier to manage permissions for users who require broad data access. Assign the object-level View All Fields permission, which grants assignees access to all fields and field data for a specific object. This permission is available for all standard and custom objects that support field permissions. Users are automatically granted access for any new fields created for the object. We delivered this feature thanks to your ideas on IdeaExchange.
How: Salesforce recommends that users manage permissions in permission sets, not profiles. In Setup, select a permission set. On the Object Settings page for a specific object, enable the View All Fields permission, and then save.
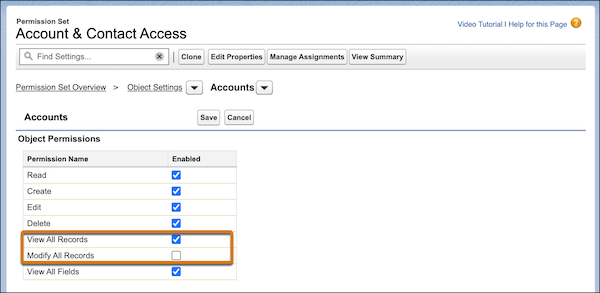
The View All and Modify All Object Permissions Have New Names
To better represent the access granted by these object permissions, the View All object permission is now named View All Records, and the Modify All object permission is now named Modify All Records.
How: You see these updated permission names in your profiles and permission sets automatically. No action is required.
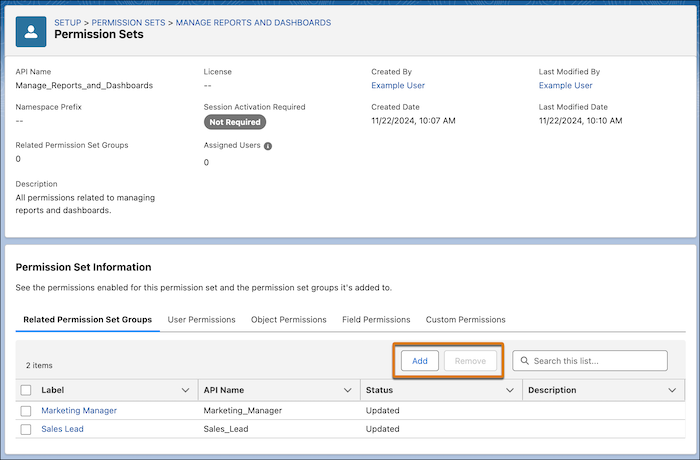
Manage Included Permission Sets in Permission Set Groups via Summaries
Update access more efficiently by specifying which permission set groups include a permission set directly from the permission set’s summary. Previously, to manage included permission sets, you were required to navigate to each permission set group’s page. We delivered this feature thanks to your ideas on IdeaExchange.
How: From Setup, in the Quick Find box, enter Permission Sets, and then select Permission Sets. Select a permission set, and then click View Summary. In the Related Permission Set Groups tab, click Add or Remove.
Find the full list of updates here - Permissions
Reports and Dashboards
Do More with Custom Report Types
Find your report types more easily, and create personalized list views of your custom report types using the improved Custom Report Type page in Setup. Edit report details and modify object relationships on the summary page, which now has a more compact layout. The redesigned report type layout editor provides more flexibility when managing custom fields and sections. And you can add up to 1,000 fields in the report type layout using lookup fields. We delivered this feature thanks to your ideas on IdeaExchange.
How: In Setup, in the Quick Find box, enter Reports and select Reports and Dashboards Settings. Select Enhanced Custom Report Type Setup Page. Then, in the Quick Find box, search for and select Report Types.
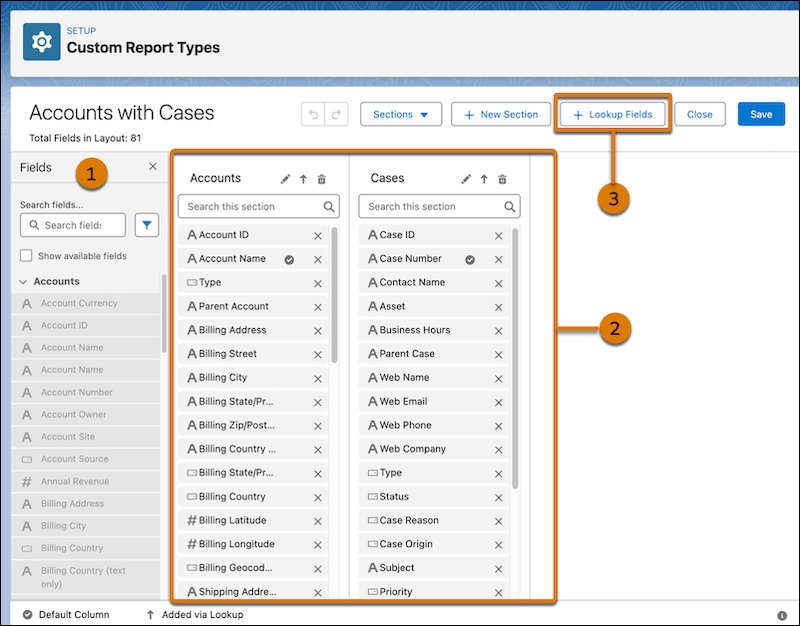
On the redesigned summary page of your custom report type, click Edit Layout.

Drag fields from the Fields panel (1) to the appropriate section on the right. You can search for fields, move them, view their details, and customize their display names (2). To find lookup fields and add them to the report type, click Lookup Fields (3).
Keep Charts Consistent with Reordered Report Data
When you sort by a field, the report chart updates to match the new order so that it’s consistent with the data table. For example, if you sort regions by descending order of sales, the chart reorders the regions accordingly, making it easier to interpret your data.
How: On the widget, click the Chart Properties icon, and select Sort Report Charts.
Find the full list of updates here - Reports and Dashboards
Sharing
Manage Public Groups More Easily with Improvements to the Access Summary
For a specific public group, view the sharing rules and list views for all objects where the public group is used to grant access. Previously, you were required to select a specific object. You can also view all the queues that are part of a specific public group.
How: From Setup, in the Quick Find box, enter Public Groups, and then select Public Groups. Select a public group, and then click View Summary. Click the Object Name dropdown and then select All Objects in the owner-based sharing rules, criteria-based sharing rules, and list views tabs.
Find the full list of updates here - Sharing
Flow Builder
Enhance Flow Performance by Controlling the Number of Records Retrieved with Get Records
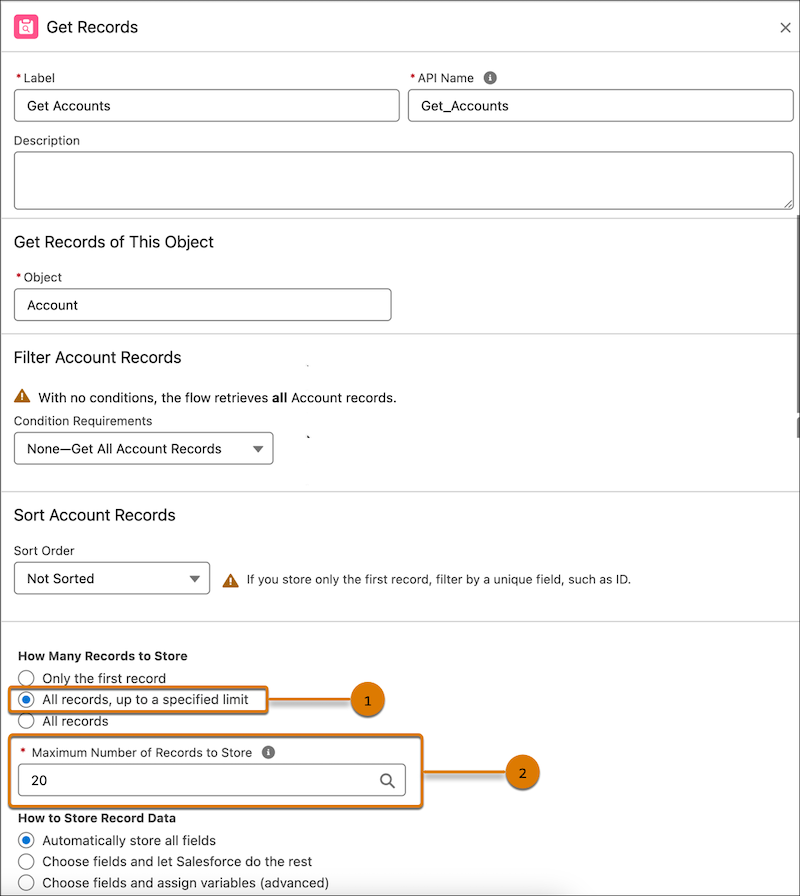
When you work with large datasets, you can hit performance issues or governor limits if you use the Get Records element to retrieve all records. If you set an upper limit to control data retrieval, you improve flow performance and reduce the risk of timeouts or errors. Use the All records, up to a specified limit option to set an upper limit on the number of records to retrieve.
How: To set a limit on the number of records that the Get Records element retrieves, first add a Get Records element to your flow. Then, under How Many Records to Store, select All Records, up to a specified limit (1). Enter the maximum number of records to store (2). The Get Records element retrieves all the records that meet the criteria up to the specified limit.
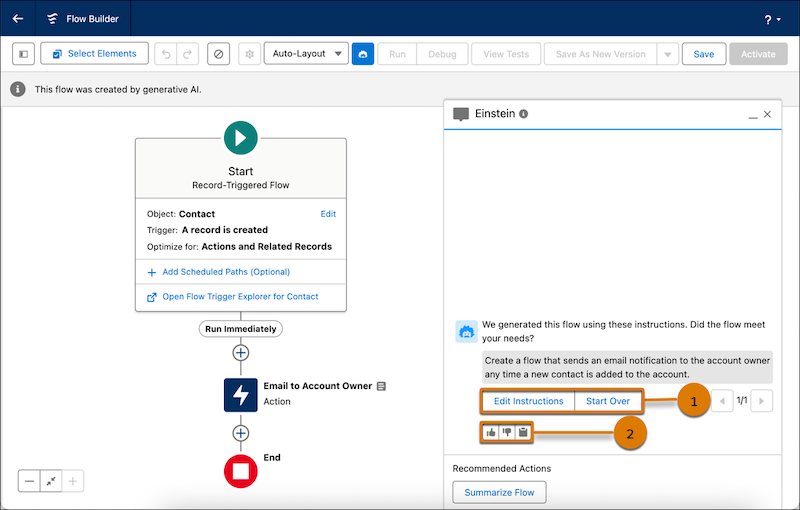
Get Help Building Flows Faster and More Accurately with Einstein
Get Einstein to use the power of generative AI and automatically build flows for you based on your instructions. Describe what you want to automate, and Einstein takes care of the rest. This feature, which is now generally available, includes some changes since the beta release. Einstein now generates more accurate flows, and it does so faster than before. You can help Einstein get even better by using the prominent feedback buttons to provide feedback on your flows.
Where: This change applies to Lightning Experience in Enterprise, Performance, and Unlimited editions with the Einstein for Sales, Einstein for Service, or Einstein Platform add-on. Einstein generative AI is available in Lightning Experience. To purchase the Einstein for Sales, Einstein for Service, or Einstein Platform add-on, contact your Salesforce account executive.
Flow creation with Einstein consumes Einstein Requests credits. Einstein Requests is a usage metric for generative AI. The use of generative AI capabilities, in either a production or sandbox environment, consumes Einstein Requests. To learn more, see Einstein Usage.
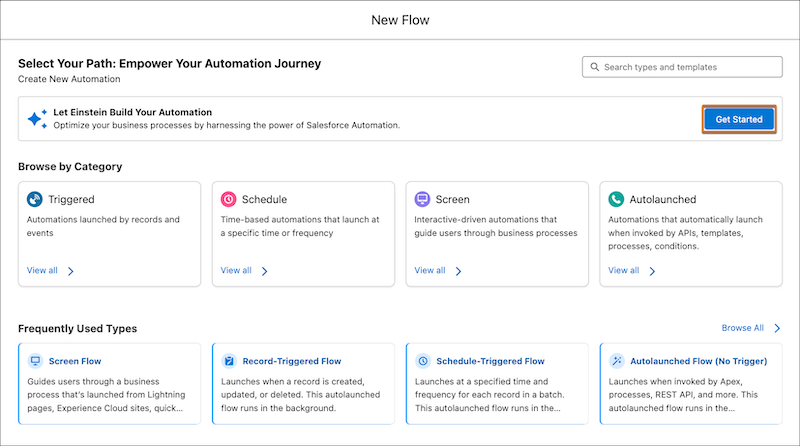
How: Turn on Einstein generative AI in Setup. Next, from Setup, in the Quick Find Box, enter Flow Creation with Einstein, and activate it. Create a flow by using the Automation Lightning app. In the Let Einstein Build your Automation section, click Get Started.
Write instructions from scratch (1), or get started with sample instructions (2).

After your draft flow opens in Flow Builder, check the flow for accuracy and safety. Also, before activating, be sure to debug and test the flow.
To get more accurate results from Einstein, share your feedback in the Einstein panel by clicking thumbs up or thumbs down (1). If the flow doesn’t meet your needs, edit the instructions or start over (2) in a new window.
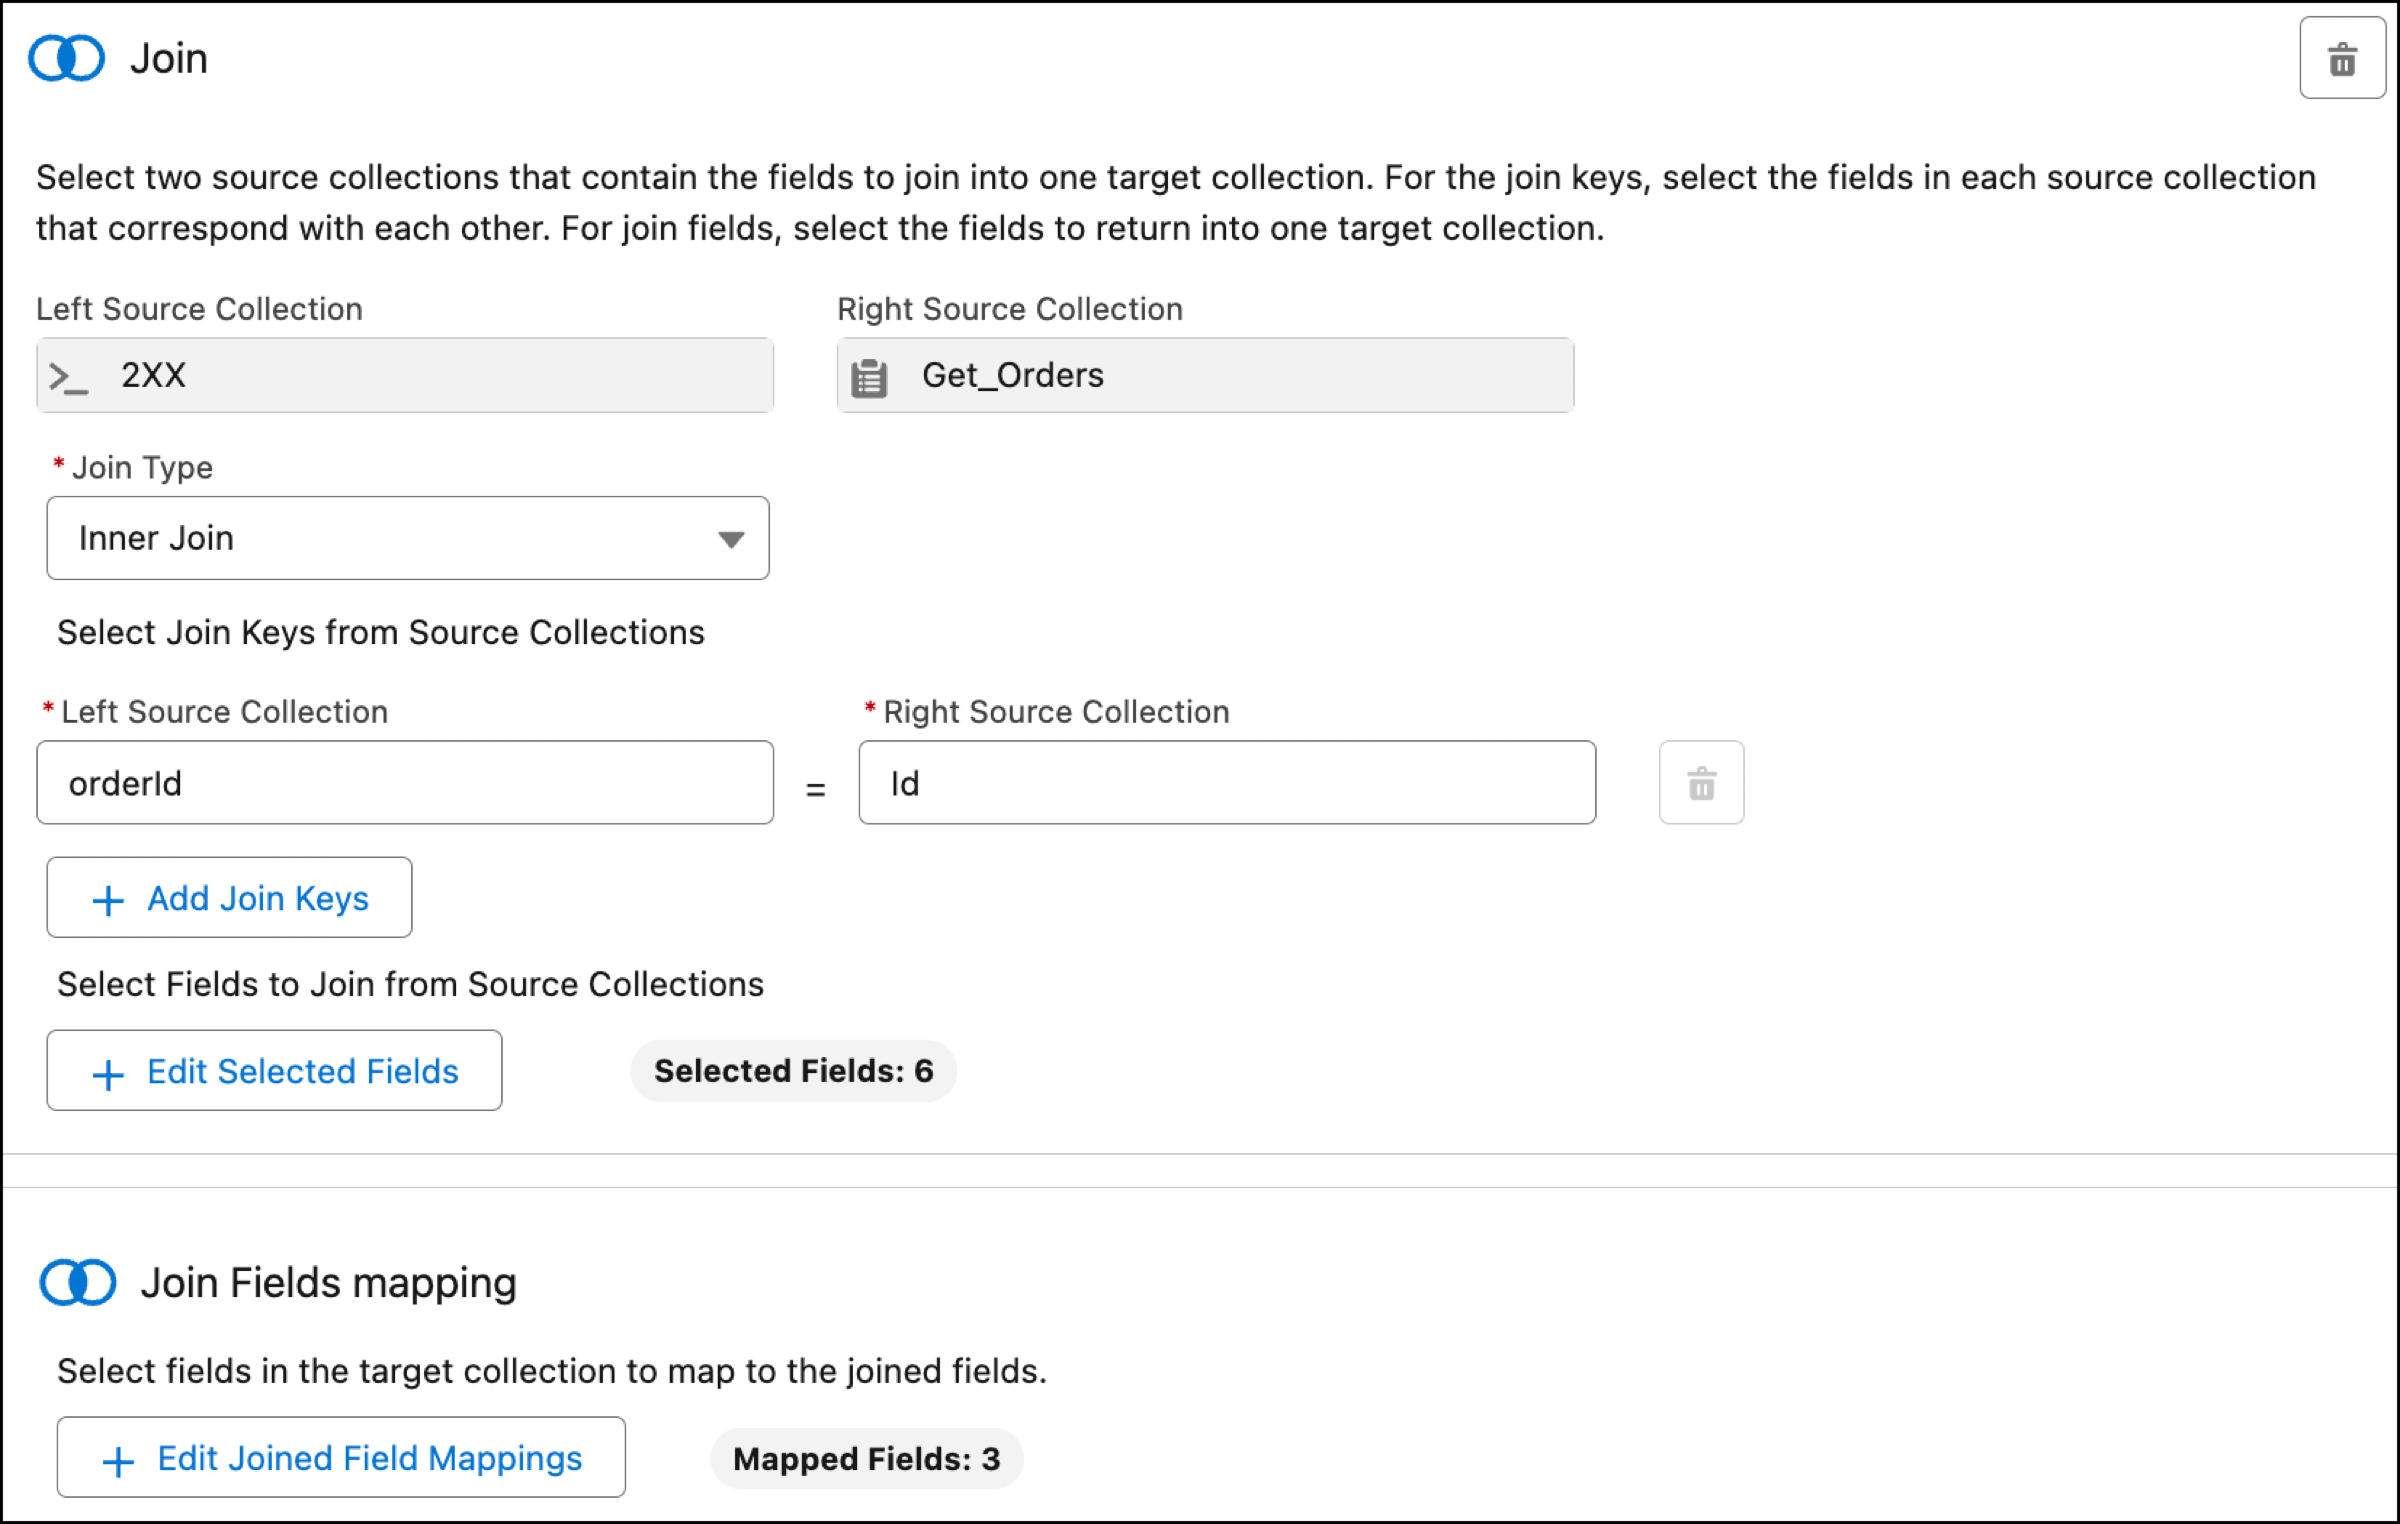
Join Collections with the Transform Element
Combine source collections from related flow resources into one target collection. For example, you can combine order records from an external system with Salesforce orders to get a combined data structure that is displayed in a data table in a flow screen. The flow screen shows each order along with the amount and the quantities.
How: From Flow Builder, add the Transform element. Add two flow resources for the source collections. Add a target collection that stores the combined data from the source collections.
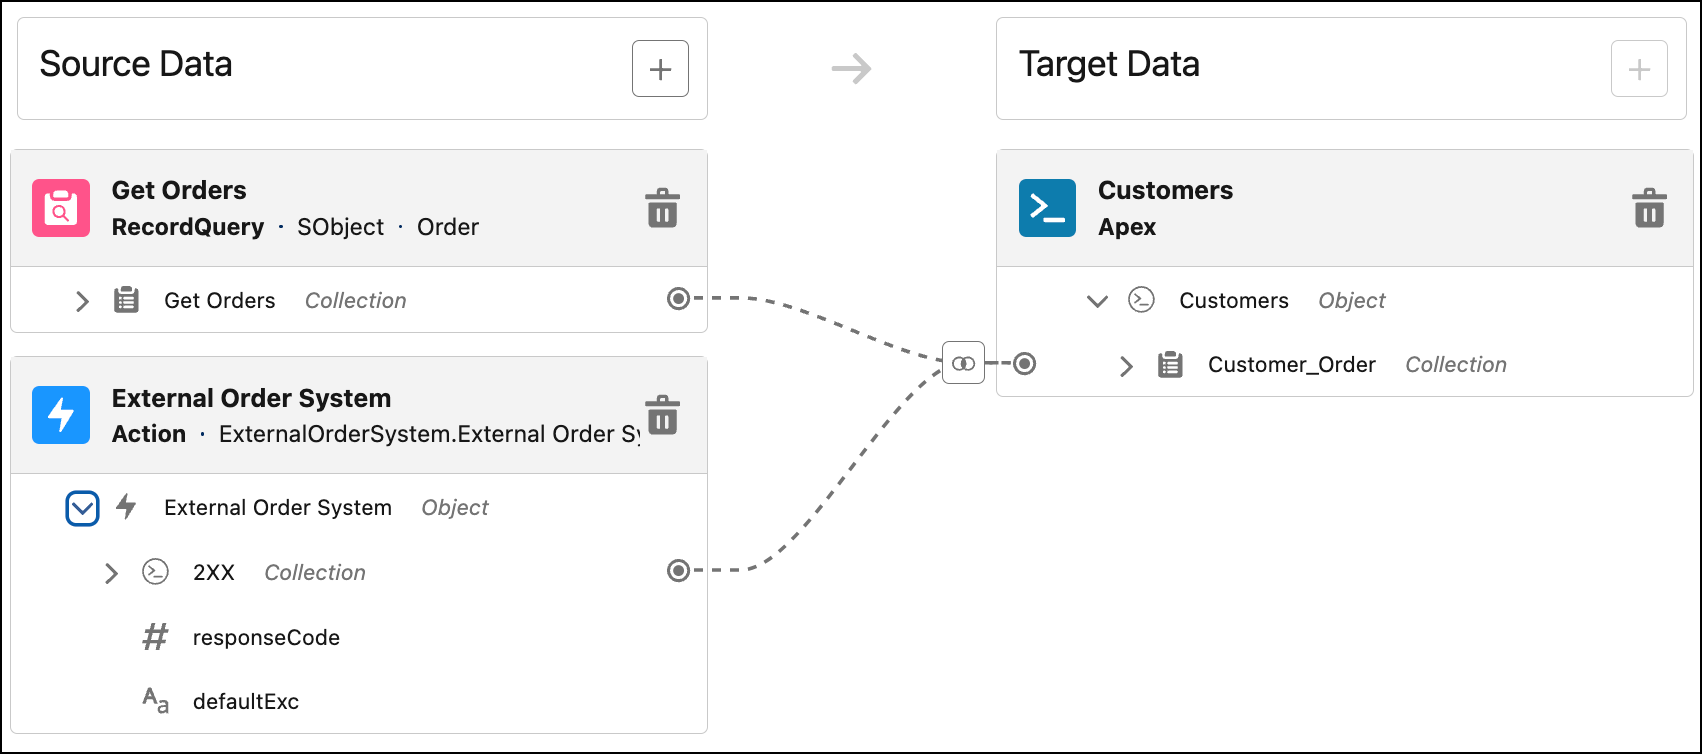
Configure the join keys for each source collection, and select the join fields to return into the target collection.
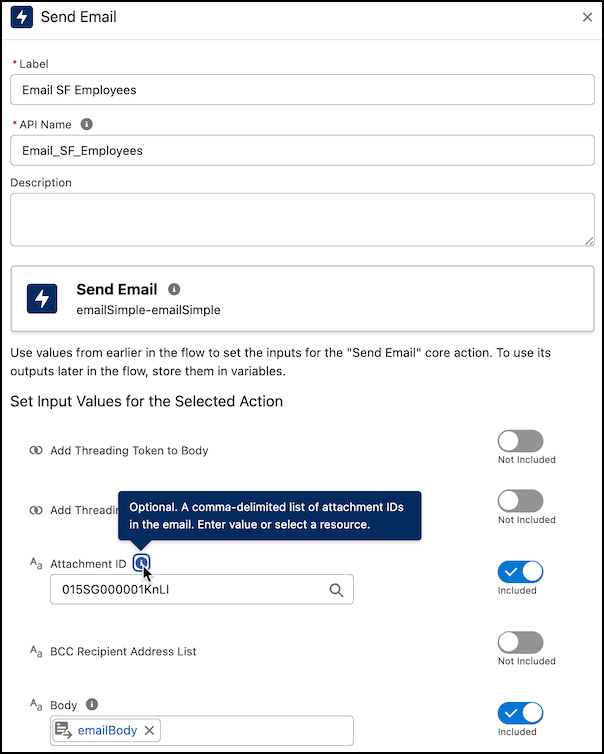
Send Emails with Attachments in Flow Builder
Enhance your Flow Builder emails by sharing documents or files with your recipients by using Send Email action. To attach a file, provide the ID of a file to the Send Email action. The maximum size of the email created, including attachments, is 35 MB.
How: In Flow Builder, in the element menu, search for and select Send Email. When you set input values, turn on the Attachment ID field, and then add the ID of the attachment. The ID can be of a Document, Content Version, or Attachment items. If you want to add more attachment IDs, enter them as a comma-delimited list.
Using attachments in the Send Email action changes the API called by the action, which changes the daily email send limit to the General Email Limit instead of the Daily Workflow Email Limit.
Find the full list of updates here - Flow Builder
Flow Builder - User Experience Updates
Create Flows with a New Streamlined Creation Experience
We reorganized the flow creation window to help you create the automation you need quickly and more efficiently. Flows are separated into four main categories, and you can filter and search to find the automation you need.
Where: This change applies to Lightning Experience and Salesforce Classic in all editions.
How: To access the new flow creation experience, click New Flow from the Automation Lightning app.
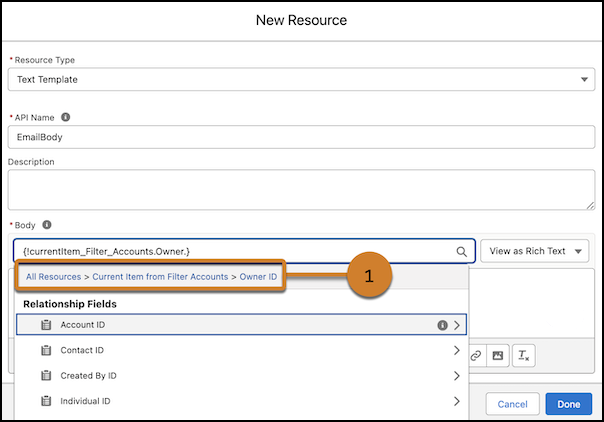
Create New Text Template and Formula Flow Resources More Easily
Flow Builder extends enhanced resource selection in creating text template and formula flow resources with improved grouping and user-friendly labeling. These improvements make it easier for you to discover the resources that you need.
Where: This change applies to Lightning Experience and Salesforce Classic (not available in all orgs) in Essentials, Professional, Enterprise, Unlimited, and Developer editions.
How: Create or open a flow in Flow Builder, and then click New Resource under the Manager panel. For the resource type, select Text Template or Formula. Insert a resource by entering a value or search for resources. The clickable breadcrumb path (1) helps you identify where you are and navigate resource groups. You can recognize resource types quickly with more intuitive icons.
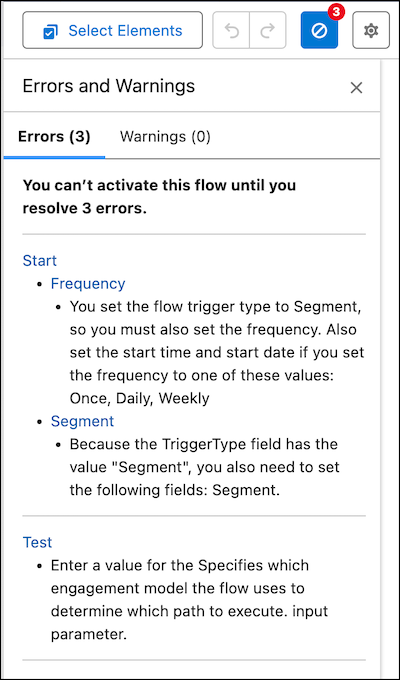
Troubleshoot Your Flow Configuration with Improvements to the Errors and Warning Pane
You can now dismiss warnings that you don't want to see again from the Errors and Warnings pane. The pane also includes more actionable messages for all elements, with links that direct you to the source of the error on the Flow Builder canvas. Errors are grouped by element so that you can address them more efficiently.
Where: This change applies to Lightning Experience and Salesforce Classic (not available in all orgs) in Essentials, Professional, Enterprise, Unlimited, and Developer Editions.
How: Create a flow, and then click the Show Error icon.
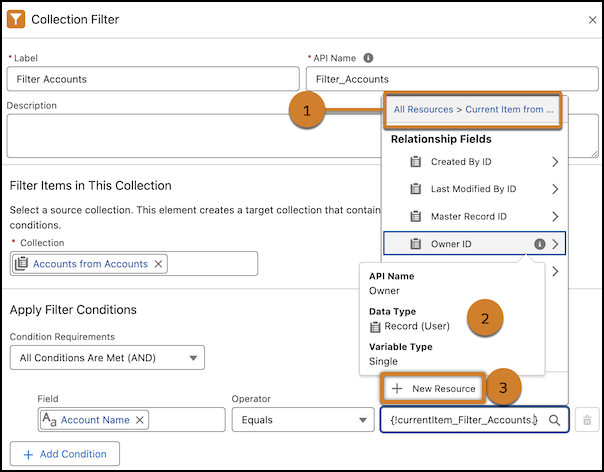
You can now search for and select child resources of the Collection Filter element in the updated resource menu within a flow. Previously, you selected the element of the child resource first, and then you selected the child resource.
How: Create or open a flow. Then add or edit a Collection Filter element. Click in the Apply Filter Conditions field and value. The clickable breadcrumb path (1) helps you identify where you are and navigate resource groups. Recognize resource types quickly with more intuitive icons. To get helpful information (2) about a resource, hover over the resource’s info icon. To create a resource quickly, click New Resource (3).
Find the full list of updates here - Flow Builder - User Experience Updates
Flow Testing and Debugging
Debug Flows at a Glance with the Improved Debugging Experience
The debugging experience for flows now includes element-level summaries to help you understand more quickly what happened at each point in a flow. For example, for an Update Records element, the Debug Details pane shows at a glance how many elements were updated after the element was executed.
How: Open a supported flow. Click Debug. Set the debug options and input variables. Click Run. Review the Debug Details pane.
Flow Management
Have Unlimited Paused and Waiting Flows
We’ve removed the per-org usage-based limit for paused and waiting flow interviews. While there’s no limit now for paused and waiting flow interviews, the number of paused and waiting flows can still be limited by the amount of storage available to your org. If you need more storage, call your Salesforce account rep.
Find the full list of updates here - Flow Management
Supported Browsers and Devices for Lightning Experience
Consider these browser restrictions when working with Lightning Experience.
-
Salesforce doesn’t support nonbrowser applications that embed WebView or similar controls to render content for Lightning Experience. Examples of approaches that embed this type of control include Salesforce Mobile SDK, Microsoft’s WebBrowser Control, Electron’s embedded Chromium browser, iOS’s UIWebView and WKWebView, and Android’s WebView.
-
Lightning Experience doesn’t support incognito or other private browsing modes.
See the supported browsers and devices for Lightning Experience
Desktop and Laptop Browsers
Salesforce supports these browsers. Make sure that your browsers are up to date. Other browsers or older versions of supported browsers aren’t guaranteed to support all features.
|
|
|
MICROSOFT EDGE (NON-CHROMIUM) |
|
|
|
|
|---|---|---|---|---|---|---|
|
Lightning Experience |
Not supported |
Not supported |
Supports latest stable browser version. Internet Explorer mode for Microsoft Edge Chromium isn’t supported. |
Supports latest stable browser version |
Supports latest stable browser version |
Supports latest stable browser version |
|
Experience Builder sites |
Not supported |
Not supported |
Supports latest stable browser version. Internet Explorer mode for Microsoft Edge Chromium isn’t supported. |
Supports latest stable browser version |
Supports latest stable browser version |
Supports latest stable browser version |
|
Special setup considerations? |
Not supported |
Not supported |
No |
No |
No |
No |
|
Limitations? |
No |
Tablet Browsers
Use Apple Safari on iPadOS (iOS 13.x or later). Lightning Experience on iPad Safari doesn’t support portrait orientation and orientation switching. Use landscape orientation, and maximize your Safari browser to full width. To prevent the tablet from switching orientation, turn on the iPad rotation lock.
|
|
APPLE® SAFARI® |
GOOGLE CHROME™ |
OTHER BROWSERS |
SALESFORCE MOBILE APP |
|---|---|---|---|---|
|
iPadOS |
Supported |
Not supported |
Not supported |
Supported |
|
Android |
— |
Not supported |
Not supported |
Supported |
Salesforce treats touch-enabled laptops, including Microsoft Surface and Surface Pro devices, as laptops instead of tablets. Users can’t access the Salesforce mobile app on these devices. Users are redirected to the full site experience that’s enabled for them—Lightning Experience or Salesforce Classic. Only standard keyboard and mouse inputs are supported on these types of devices.
Phones
For the best experience, use the Salesforce mobile app.
Third-Party Browser Extensions and JavaScript Libraries
Before using a third-party browser extension or JavaScript library, Salesforce recommends that users check AppExchange for browser extensions and apps from Salesforce partners or the Component Reference for base components that match requirements.
Although some third-party browser extensions can personalize and enhance the Salesforce experience, it is not recommended to use browser extensions that manipulate the DOM. Using third-party browser extensions is at the user’s risk. Salesforce can’t prevent these extensions from accessing user’s Salesforce data, nor can it detect that there’s any attempt to access data. Additionally:
-
Browser extensions that insert or remove elements in the DOM can interfere with the stability of Lightning Experience and lead to unexpected behavior.
-
Browser extensions that don’t follow Salesforce security standards can fail to work properly in Lightning Experience.
-
The internal DOM structure of Lightning Experience can change in a future release, and compatibility with a third-party browser extension isn’t guaranteed.
To use a third-party JavaScript library with custom Lightning components, upload it first as a static resource. Use the JavaScript library by loading it in the component depending on which model that you’re using.
-
Lightning Web Components: Load a third-party JavaScript library via
lightning/platformResourceLoader -
Aura Components: Load a third-party JavaScript library via
ltng/require

