This article includes links to and information from outside resources. We are not responsible for the content on the external site. If there is a link that does not work, please email [email protected] and we will attempt to adjust the information with an updated link.
We are so excited to partner with Salesforce because their releases help you, too! The Spring '24 release for Salesforce is currently rolling out, and below are some of the key enhancements we want to highlight as your Salesforce partner.
The Release Date for Spring '24 will depend on the instance of Salesforce, but the main release weekends are on:
-
January 12, 2024
-
February 02, 2024
-
February 09, 2024
If you already know the instance your production Org is located on, you can head over to Trust Status, click on your instance name, and hit “Maintenance”. This will show you the date of the Salesforce Spring '24 release hitting your Org. If you don’t know your instance, the quickest way to find out is to head to “company information” within “Setup” in your Salesforce.
Please Note: Any references to restricted objects (i.e., Opportunities, Campaigns, Cases, Leads, and Opportunities) are used exclusively as examples referenced by the Salesforce Release Notes.
General Setup
Get Improved Accessibility in List Views
These are small but important changes that make list views more accessible.
Where: These changes apply to Lightning Experience in Group, Professional, Enterprise, Performance, Unlimited, and Developer editions.
How: Check out the details about these changes -
-
The Pin List View button has a more visible keyboard focus indicator when selected.
-
A user can use a keyboard to select a List View header link in a small region on a Lightning page.
-
In the list view Charts panel, the button to close the panel has a clearer assistive label, which now reads “Close charts” instead of “Hide charts.” Additionally, a descriptive tooltip appears when a user moves the keyboard focus to the Close Charts button in the Charts panel, or they move it to the Close Filters button in the Filters panel.
-
To provide more information to assistive technology users, the Benefits list view on the Related tab of the Benefit Type record page has an accessible label that provides the table name.
-
In a list view without any items, keyboard focus follows a more logical pattern. Previously, keyboard focus sometimes moved to hidden elements.
-
The records list in split view has a new infobubble that clarifies how to navigate between individual records and select them with the keyboard.
-
Screen readers announce the details of errors that occur when a user saves inline edits. Additionally, the inline error window has clearer assistive text.
-
A record preview icon is now present for items in related lists. With this change, keyboard users can navigate to the preview icon via the Tab key and launch the record preview.
See Required Fields at a Glance on Dynamic Forms-Enabled Page Views
When users create, edit, or clone records on Dynamic Forms-enabled pages on a desktop, a message now tells you that fields with asterisks are required.
Where: This change applies to Lightning Experience in all editions.
How: Salesforce shows “* = Required Information” on the top right of the page if you’re creating, fully editing, or cloning a record. When inline editing, the message is at the bottom right of the page.

Find the full list of updates here - General Setup
Lightning App Builder
Add Fields from Related Objects to Dynamic Forms-Enabled Page
Drill into lookup relationship fields from the component palette in the Lightning App Builder and access fields from related objects. To display relevant data from related objects, drag the cross-object fields onto your record page. This feature was delivered as per the ideas on IdeaExchange.
Where: This change applies to Lightning Experience in Group, Professional, Enterprise, Performance, Unlimited, and Developer editions.
How: Salesforce made some small enhancements to the Lightning App Builder UI to help users navigate through relationship fields.
On the Fields tab, a breadcrumb at the top shows the spans that you drilled into. The top-level breadcrumb indicates the object that the page is associated with.
Cross-object relationship fields have an arrow icon (>). You can drag them onto the page as is, or click the arrow icon to drill in.

When users select a cross-object field on the canvas, a new Object property shows the relationship of the field to the base object associated with the Lightning page.
Users can drill down two levels. Polymorphic relationship fields—where the related object can be one of several different types of objects—aren’t supported as cross-object fields in Lightning App Builder.
Set Field Visibility by Device in Dynamic Forms
Previously, users could set visibility rules based on device form factor on Field Sections and other components but not on individual fields. Now, the desktop and mobile Lightning record pages can be customized even more granularly and restrict field visibility by device form factor, such as desktop or phone.
Where: This change applies to Lightning Experience in Group, Professional, Enterprise, Performance, Unlimited, and Developer editions.
How: On a Dynamic Forms-enabled page in the Lightning App Builder, select a field on the canvas. In the properties pane, create a visibility rule filter using the Device context to set the field to display exclusively when its page is viewed in a specific experience.

Translate the Related List Label in the Dynamic Related List - Single Component
To show users the Related List label in their language, create a custom label with translations in Setup. In the Lightning App Builder, go to the Lightning page where you want to include the Dynamic Related List - Single component. Enter {!$Label.customLabelName} in the Related List Label field, replace “customLabelName” with the name of your custom label, and save your changes. Users whose language is set to the language of your translated custom label see the translated value. We delivered this feature thanks to your ideas on IdeaExchange.
Where: This change applies to Lightning Experience in Professional, Enterprise, Performance, Unlimited, and Developer editions.
See a Field’s Object Relationship and API Name in Dynamic Forms
In the Lightning App Builder, all fields on Dynamic Forms-enabled pages have two new properties: Object and API Name. The Object property shows the object that the field is associated with, which is helpful when your page has fields from more than one object. The API Name property shows the unique API name of the field.
Where: This change applies to Lightning Experience in Group, Professional, Enterprise, Performance, Unlimited, and Developer editions.
How: Click a field in a Dynamic Forms-enabled page in the Lightning App Builder to see the new API Name and Object properties in the property pane.
For cross-object fields, the Object property shows the relationship of the field’s object to the base object associated with the Lightning page.
For example, on a contact record page, if you add the Individual field and look at its properties, the Object property shows you that it’s from the Contact object.
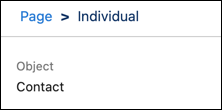
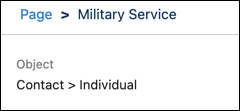
If users drill into the Individual field and add the Individual object’s Military Service field to your page, the Object property shows the full object relationship mapping of the Military Service field. Military Service is on the Individual object, but users also see its parent object relationship to Contact.
Find the full list of App Builder updates here - App Builder
Permissions
Use Permission Set Groups in All Editions
To help Salesforce users better manage users’ permissions, permission set groups are available in all editions.
Where: This change applies to Lightning Experience and Salesforce Classic in Contact Manager, Group, Essentials, Professional, Enterprise, Performance, Unlimited, Developer and Database.com editions.
Get Notified Before Deleting Permission Sets Assigned to Users
If users try to delete a permission set included in a permission set group that’s assigned to users, they now receive an error. Users can only delete a permission set that isn’t assigned to users either directly or through a permission set group. Previously, this action wasn’t blocked, which allowed users to be assigned to empty permission set groups without enabled permissions.
Where: This change applies to Lightning Experience and Salesforce Classic in Contact Manager, Group, Essentials, Professional, Enterprise, Performance, Unlimited, Developer, and Database.com editions.
Find the full list of Permissions updates here - Permissions
Sharing
Update Organization-Wide Defaults Faster
Changes to organization-wide defaults now process quicker when you have a large number of parent accounts, person accounts, or associated portal accounts. You can monitor the progress of these smaller phases of the larger org-wide defaults recalculation operation on the Background Jobs page.
Where: This change applies to Lightning Experience and Salesforce Classic in Professional, Enterprise, Performance, Unlimited, Developer, and Database.com editions.
When: This update is available on a rolling basis beginning in Spring ’24.
How: From Setup, in the Quick Find box, enter Background Jobs, and then select Background Jobs.
Find the full list of Sharing updates here - Sharing
Lightning Reports and Dashboards
Control the Report and Dashboard Sharing from the Analytics Tab
The folder sharing features on the Reports and Dashboard tabs are now available on the Analytics tab. For example, when sharing a report folder, users get the same controls and granular permission settings, ensuring that the collaboration remains secure and tailored to users needs. Instead of navigating through separate tabs to share folders with customized settings, users can now manage shared content from one centralized location.
Where: This change applies to Lightning Experience in Group, Essentials, Professional, Enterprise, Performance, Unlimited, and Developer editions. Access to CRM Analytics assets is available for an extra cost.
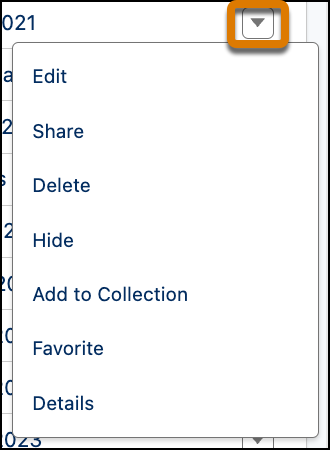
How: From the App Launcher, find and select Analytics, then browse or search for a report or dashboard folder. Click the row-level action menu button for the folder, and click Share.
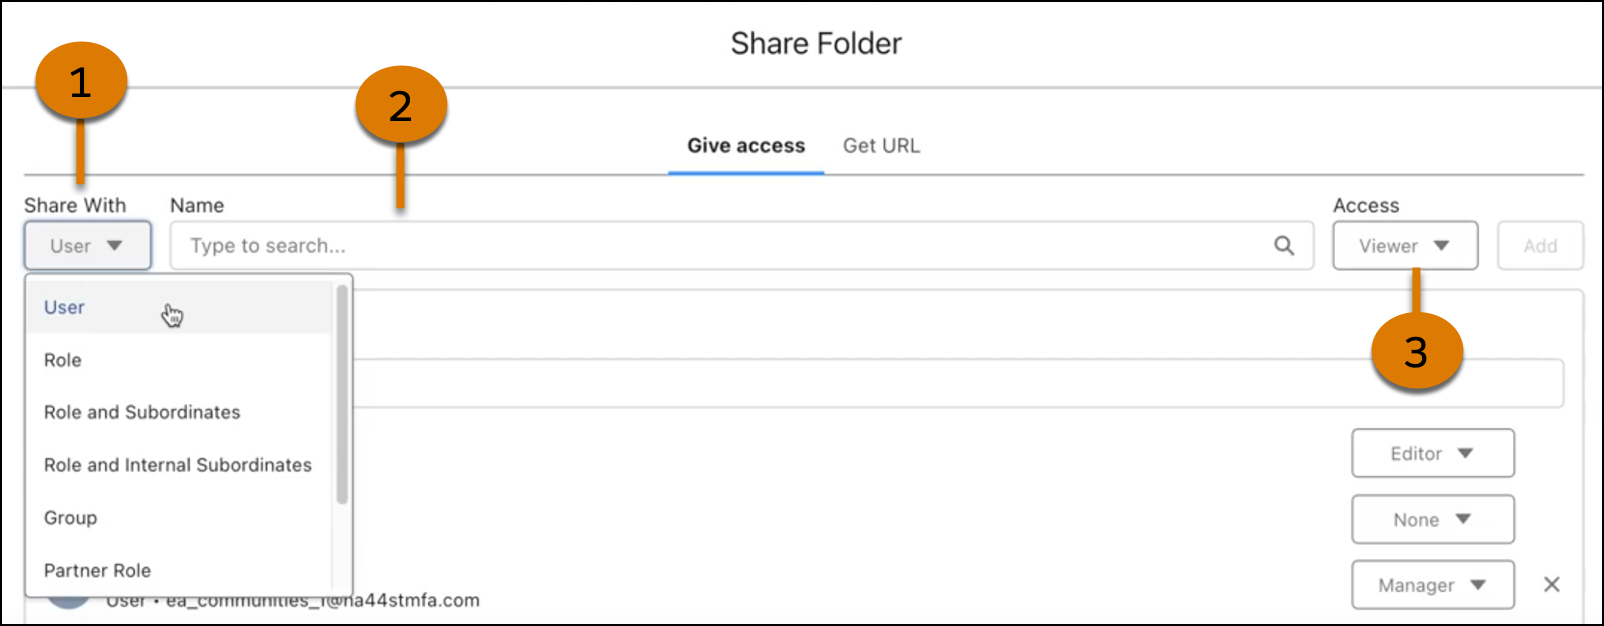
From the Give access tab, select a user, role, or group (1), search for a name (2), then assign access (3).
Transfer Lightning Dashboard Ownership (Generally Available)
Transfer Lightning dashboard ownership when responsibilities change or the current owner leaves your organization. Users can change the ownership of multiple dashboards at one time and can send an email notification to the new owner. Previously, you had to clone or re-create the dashboard to provide access to a new owner.
Where: This change applies to Lightning Experience in Group, Essentials, Professional, Enterprise, Performance, Unlimited, and Developer editions.
How: To reassign a single dashboard, on the Dashboards or Analytics tabs select Change Owner from the dashboard’s actions.
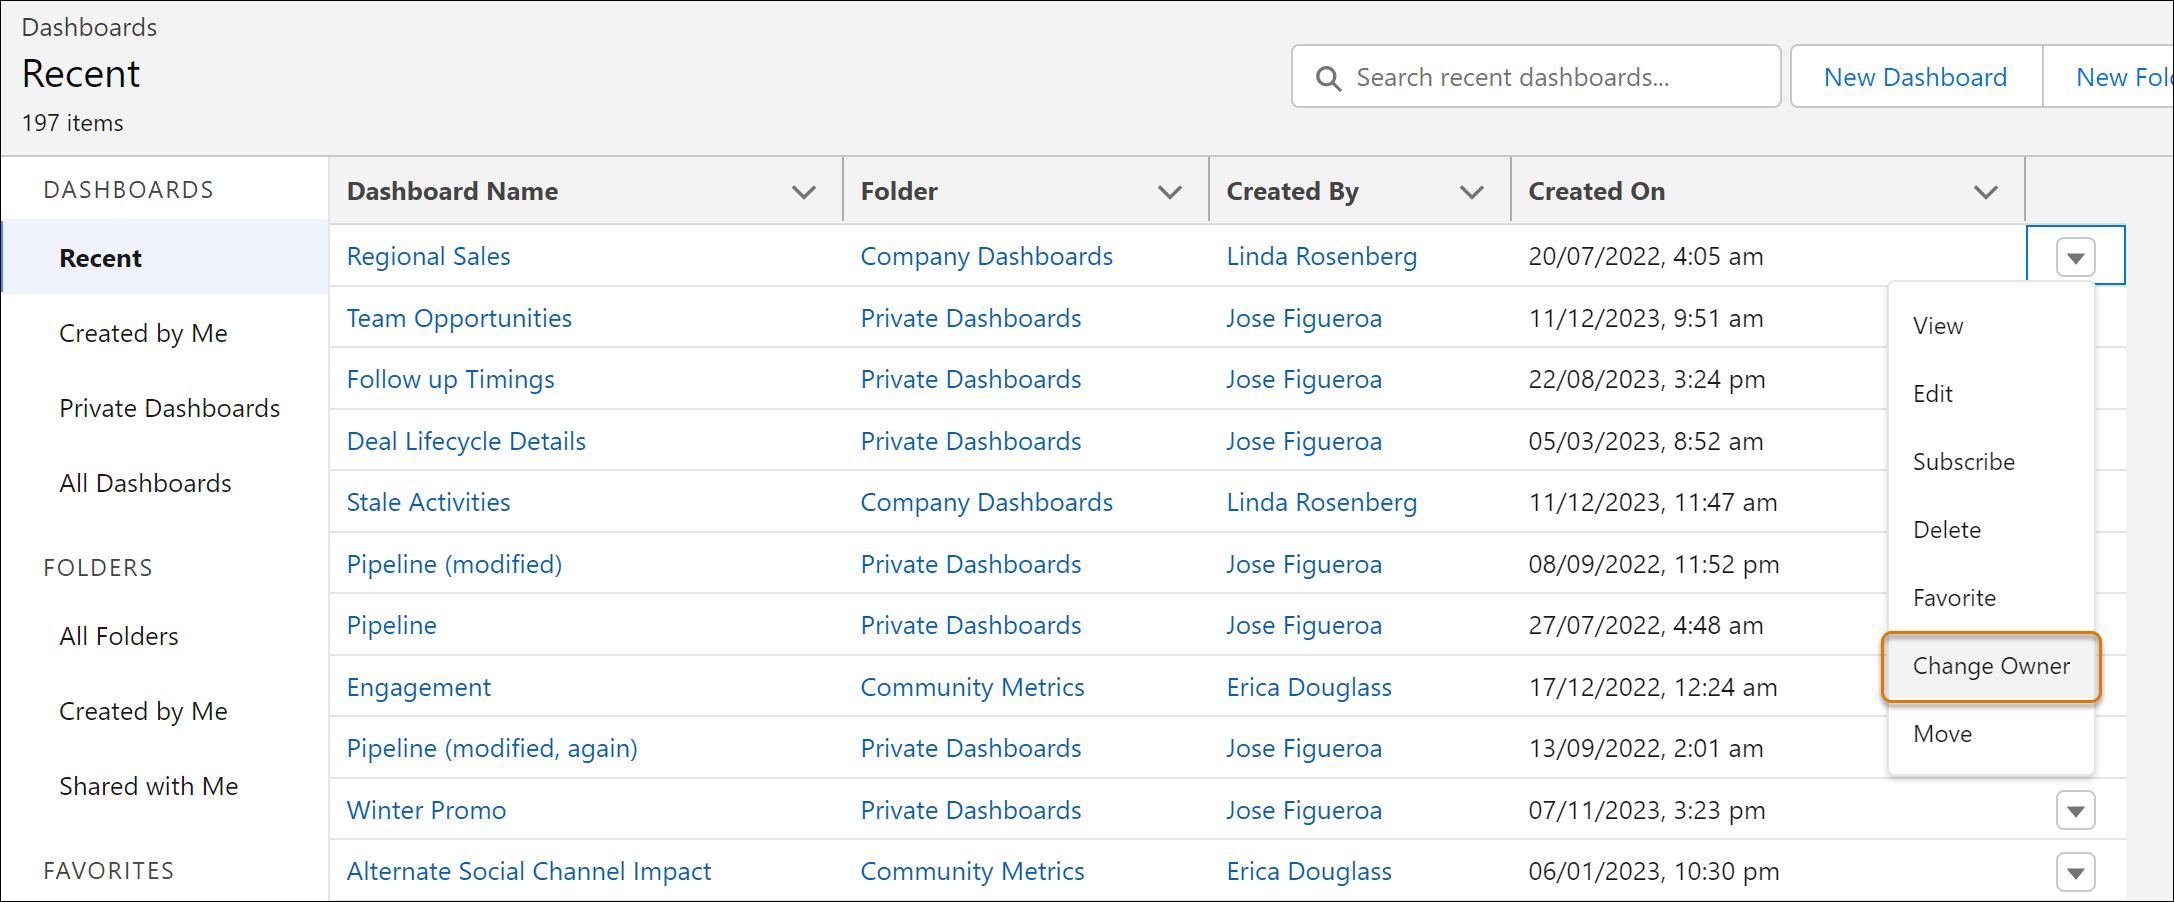
When someone leaves your organization, users can reassign all their dashboards on the Analytics tab. Select the dashboards, and then in the Manage Items menu, select Change Owner.
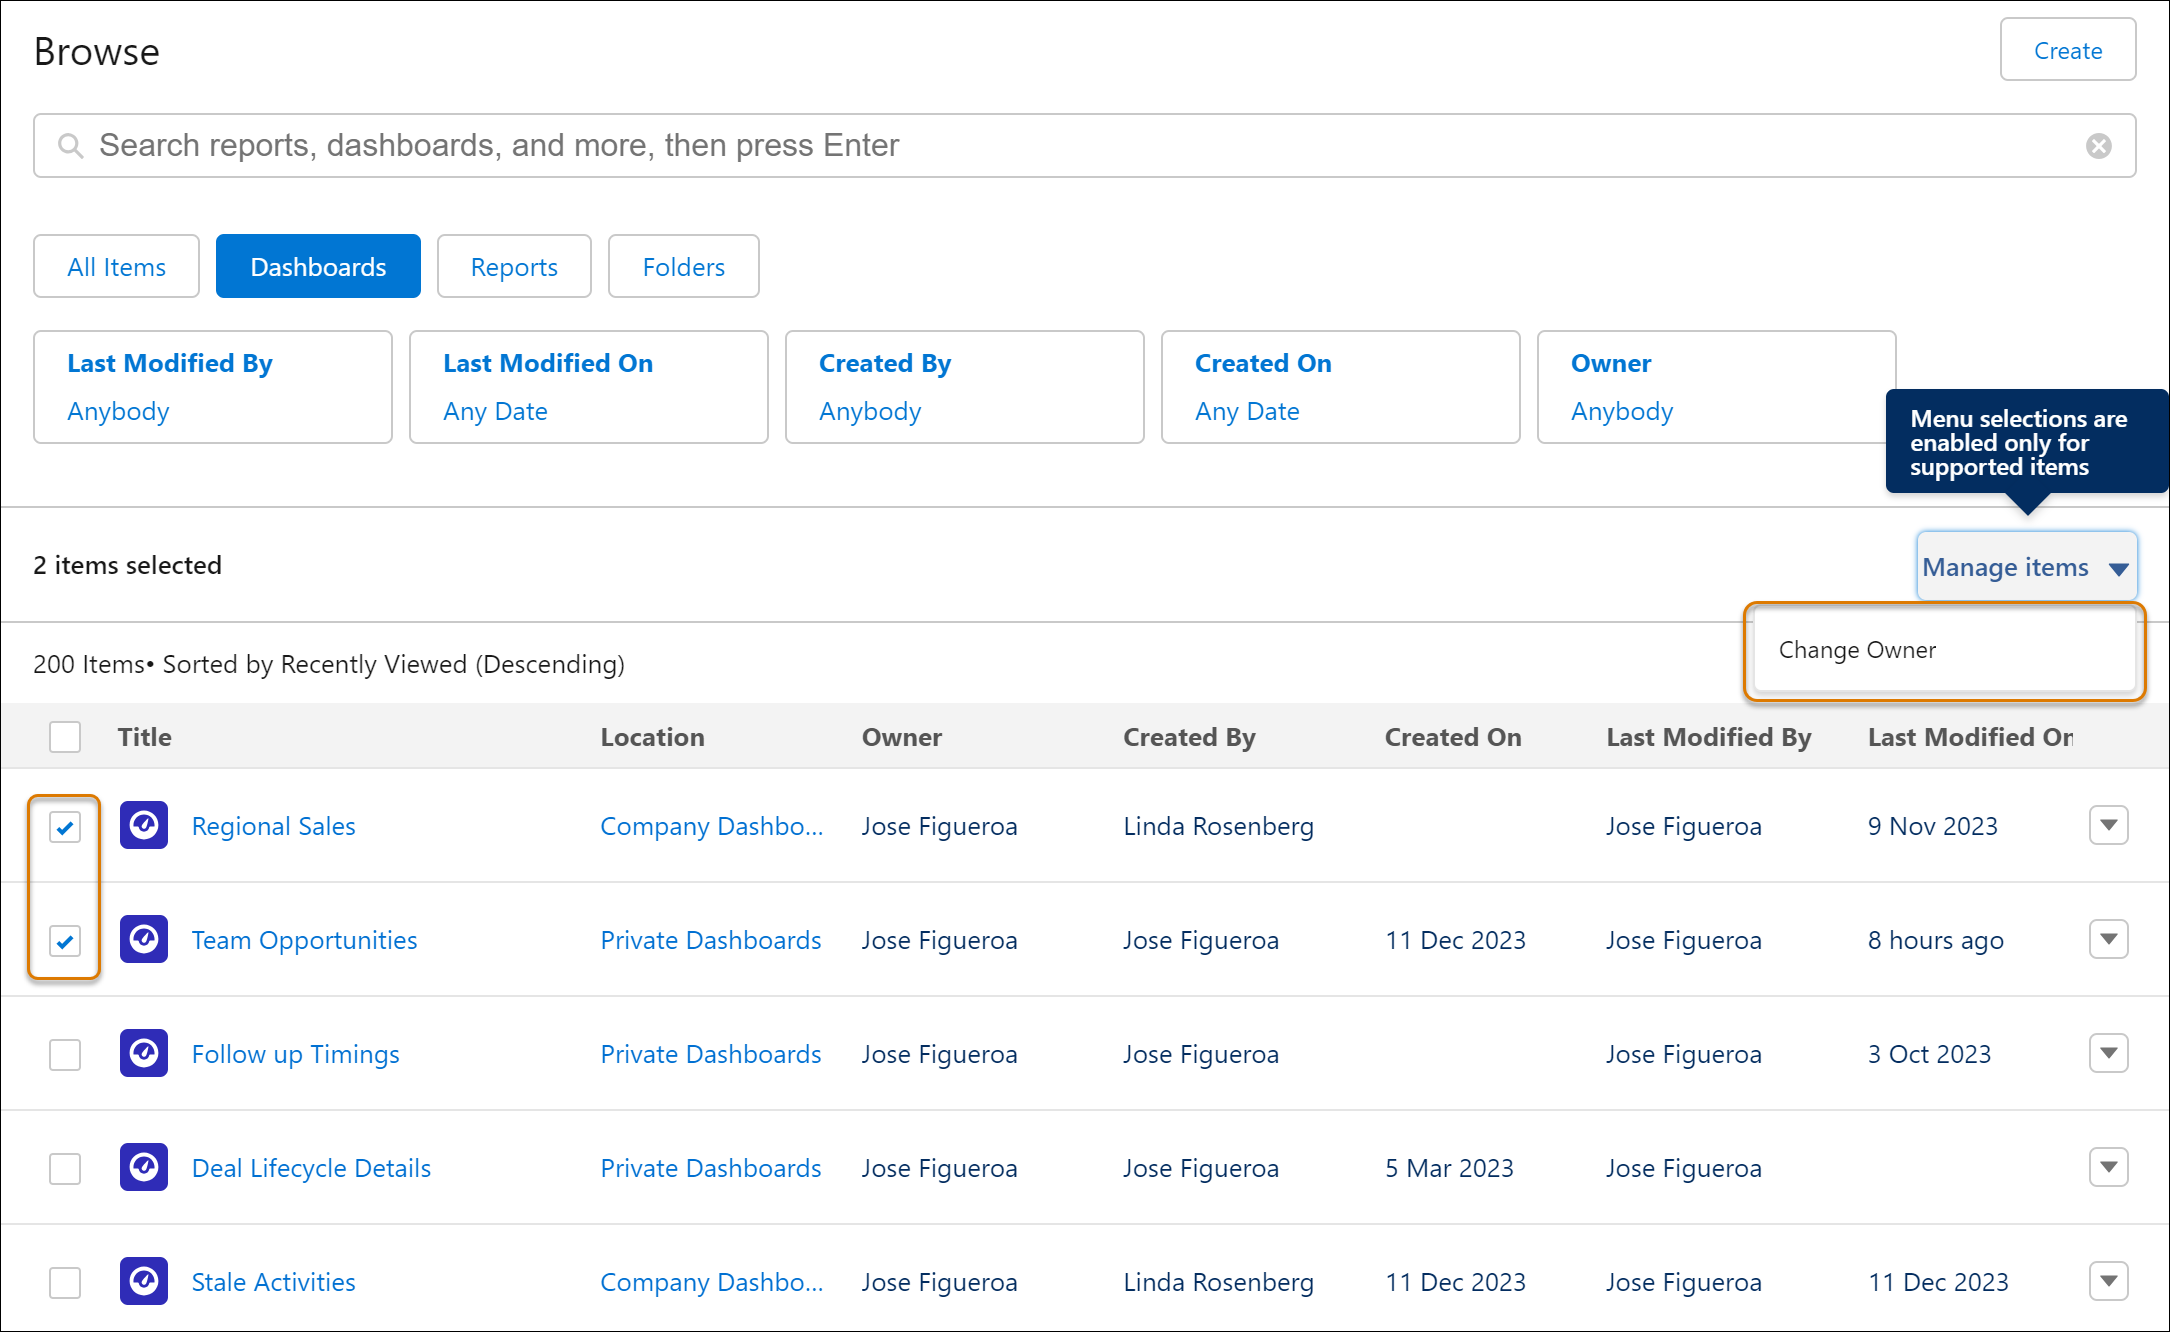
To notify the new owner, select Send email notification in the Change Owner window.
Focus Your View with More Dashboard Filters in All Salesforce Editions
Users in all Salesforce editions can now refine and target dashboard data with up to five filters on Lightning dashboards. With more filters, users can reuse the same dashboard for different teams while preserving the filters that are already set up. Save time and effort and reduce dashboard redundancy by eliminating the need to clone dashboards for different teams and business units.
Where: This change applies to Lightning Experience in Group, Essentials, Professional, Enterprise, and Developer editions.
How: For example, previously, if you filtered on Prospect Stage, Relationship Owner, and Created Date, you couldn’t add a State/Province filter to reuse the dashboard for all your teams. Now you can include the Province/State filter and even have room for a Segmentation filter.

Easily Update Fields in Lightning Report Filters
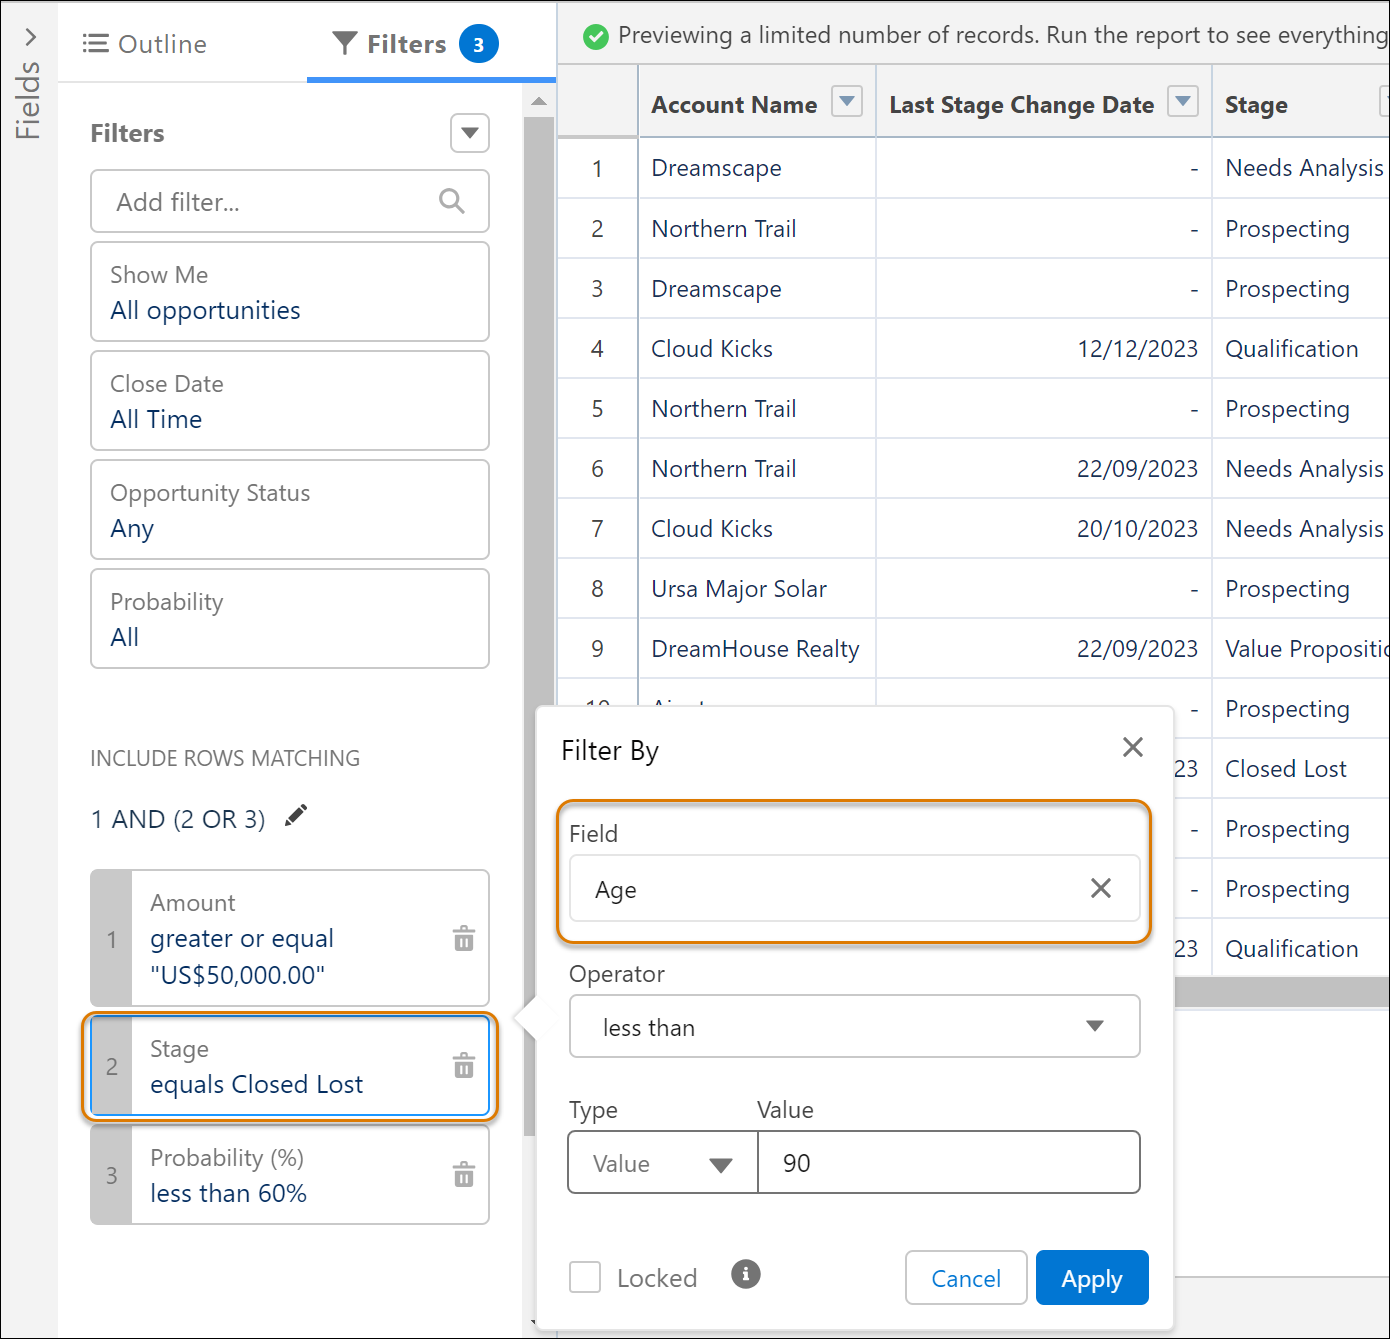
Save time when updating filters in response to changing reporting needs. Users can now change the field in a Lightning report filter without deleting the filter and adding a new one. For example, users can change a filter on Industry to a filter on Type in a report on accounts without having to remove and recreate the filter and filter logic. In earlier releases, users could change the operator and value but not the field. Previously, this feature was available only in Salesforce Classic.
Where: This change applies to Lightning Experience in Group, Essentials, Professional, Enterprise, Performance, Unlimited, and Developer editions.
How: In the Filter By window, change the field, operator, or value.
Rearrange Multiple Lightning Report Columns at Once
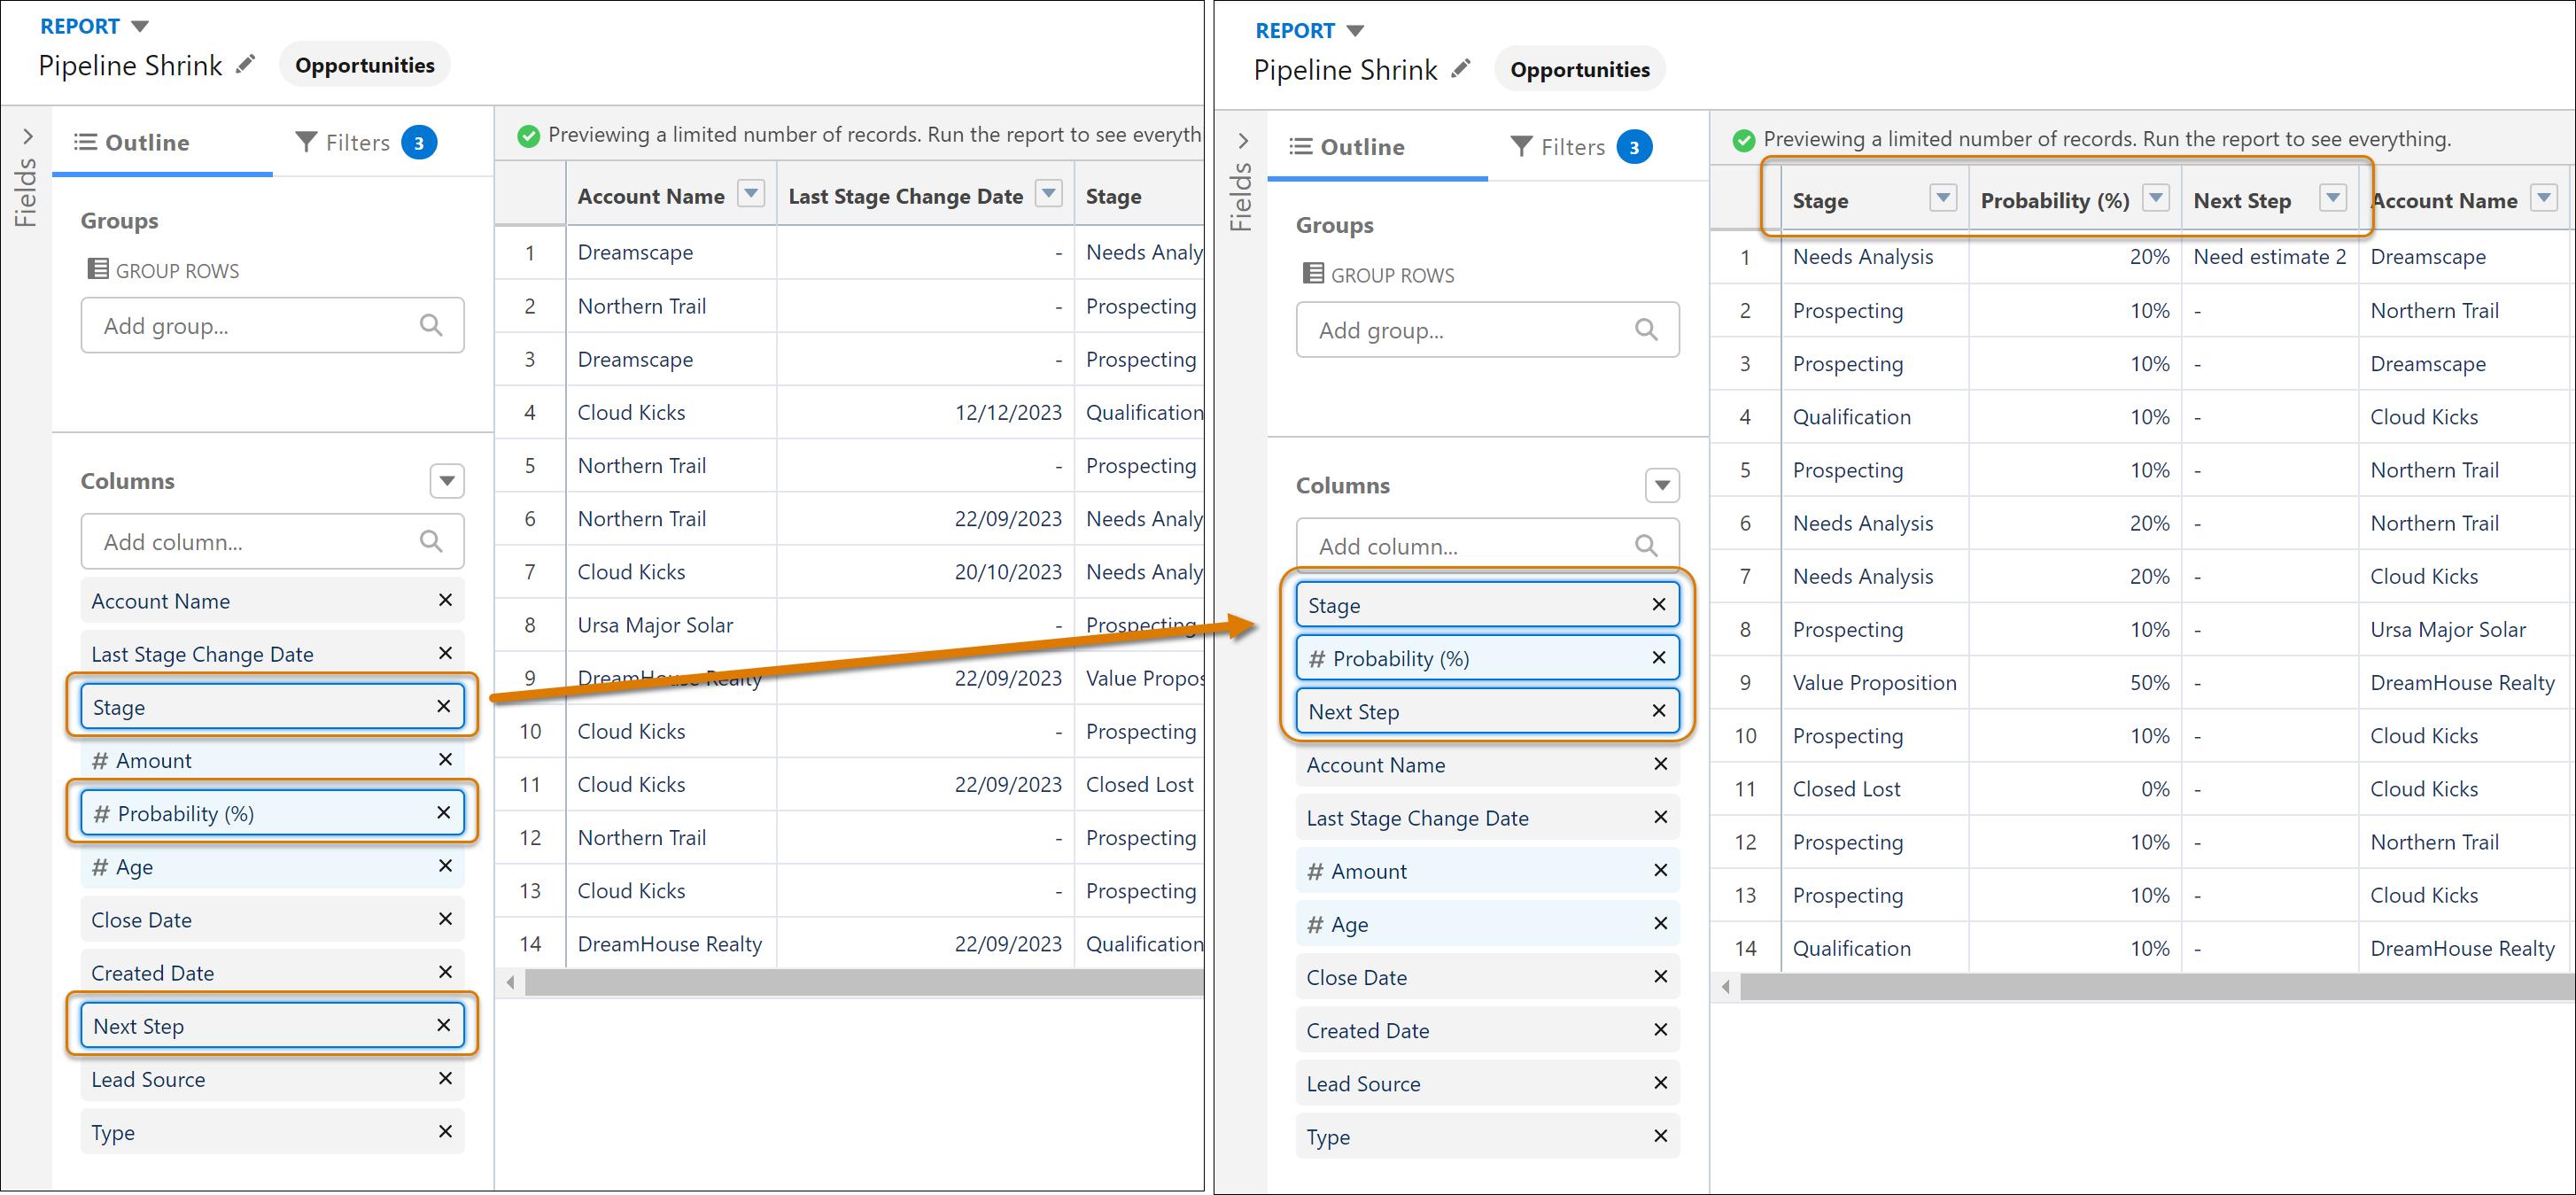
Now users can move multiple columns in the Lightning report builder at the same time. Previously, this feature was available only in Salesforce Classic.
Where: This change applies to Lightning Experience in Group, Essentials, Professional, Enterprise, Performance, Unlimited, and Developer editions.
How: In the Lightning report builder, select the columns in the report table or Columns list and drag them to the new location.
Filter Report Types by Objects or Fields in Enterprise and Performance Editions
Ensure the Lightning reports that are created contain the required data without trial and error. Enterprise and Performance Edition users can now quickly find all the report types that include specific Salesforce objects or fields. For example, if users are building a report that needs to include the Age field on the Case object and the SLA field on the Account object, add those fields to the report type filter to see report types that include those fields. Users can filter report types by up to 20 objects or fields but cannot filter by fields included in a lookup or part of a composite field, such as geolocation or address. Previously, this feature was available only in Unlimited Edition.
Where: This change applies to Lightning Experience in Enterprise and Performance editions.
How: In the Create Report window, click Filter report types, and select either Salesforce objects or fields to search.

Supercharge the Visualizations with Images, Rich Text, and Dashboard Widgets
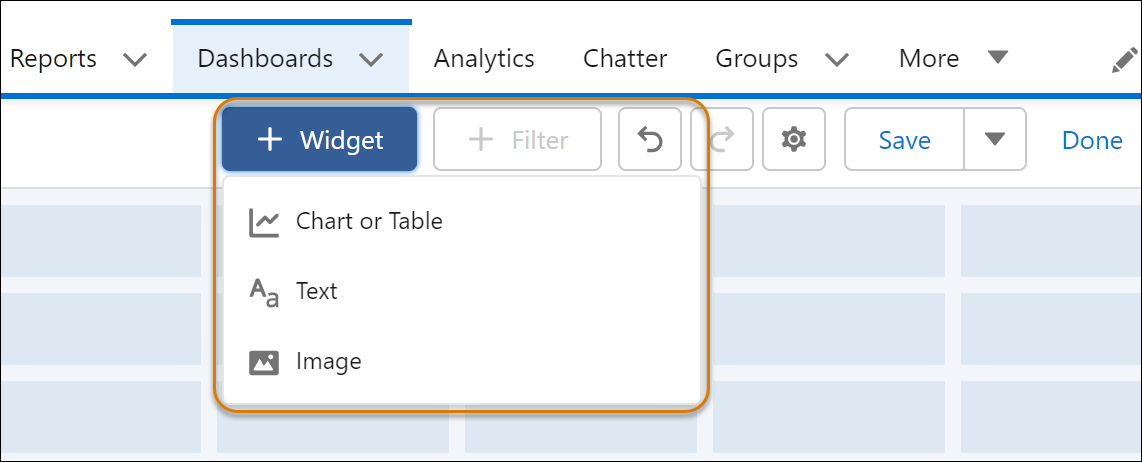
Salesforce users in all editions can now use rich text and image widgets in Lightning dashboards. Explain charts, describe metrics and KPIs, and clarify tables with rich text right where users need it. Add company logos and branding, flow diagrams, and embedded images. Guide users through their data with section titles, narrative text, and even animated GIFs. Lightning dashboard components are now called widgets in all editions. Dashboards now support up to 25 widgets, including a maximum of 20 charts and tables, 2 images, and 25 rich text widgets. The former limit was 20 in total. Previously, this feature was available only in Unlimited Edition and Performance editions.
Where: This change applies to Lightning Experience in Group, Essentials, Professional, Enterprise, and Developer editions.
How: When editing a dashboard, click +Widget and select the type of widget to add.
Find the full list of updates here - Analytics
Hyperforce
Migrate to Hyperforce with Hyperforce Assistant (Generally Available)
Users can migrate to Hyperforce with help from Hyperforce Assistant. The assistant is now generally available for Salesforce production and sandbox orgs. The Prepare page guides you to the Salesforce Optimizer tool, and an updated IP allowlist section includes recommendations for using mTLS or 2-way SSL with IP domains.
Where: This change applies to Lightning Experience in all editions.
How: From Setup, in the Quick Find Box, enter Hyperforce Assistant and then select Hyperforce Assistant.
Access Salesforce in More Regions with Hyperforce
With Hyperforce, users can choose from a growing number of worldwide regions to host your Salesforce org. Hyperforce gives users more choice and control over data residency.
Where: Delivery via Hyperforce of the Salesforce Customer 360 application suite, including Sales Cloud, Service Cloud, B2B Commerce, Platform, and Industries Cloud is newly available in South Korea and Sweden. It continues to be available in Australia, Canada, France, Germany, India, Indonesia, Italy, Japan, Singapore, the United Kingdom, and the United States. The Salesforce Customer 360 application suite is available on Hyperforce by request only in Switzerland and the United Arab Emirates. Additionally, these products are available on Hyperforce where noted.
Flow Builder
Save the Progress of the Flow as You Build Expanded to More Elements
With this update, you can save your flow at any point in the building process without finishing the configuration for all elements except for Screens and Action. Required values don’t need to be completed. Errors that previously prevented you from saving your flow are now warnings.
Where: This change applies to Lightning Experience and Salesforce Classic in Essentials, Professional, Enterprise, Unlimited, and Developer editions.
How: In Flow Builder, open an existing flow. Add any element except a Screen or Action. Start configuring the element. Field changes can be performed individually rather than in bulk for continuous editing. To undo your changes one at a time, click (1). Don’t finish configuring your new element. To keep your changes and return to the canvas, click ![]() (2).
(2).
When you return to the canvas, your element that isn’t fully configured is identified with the new error icon (3). Save your work (4).
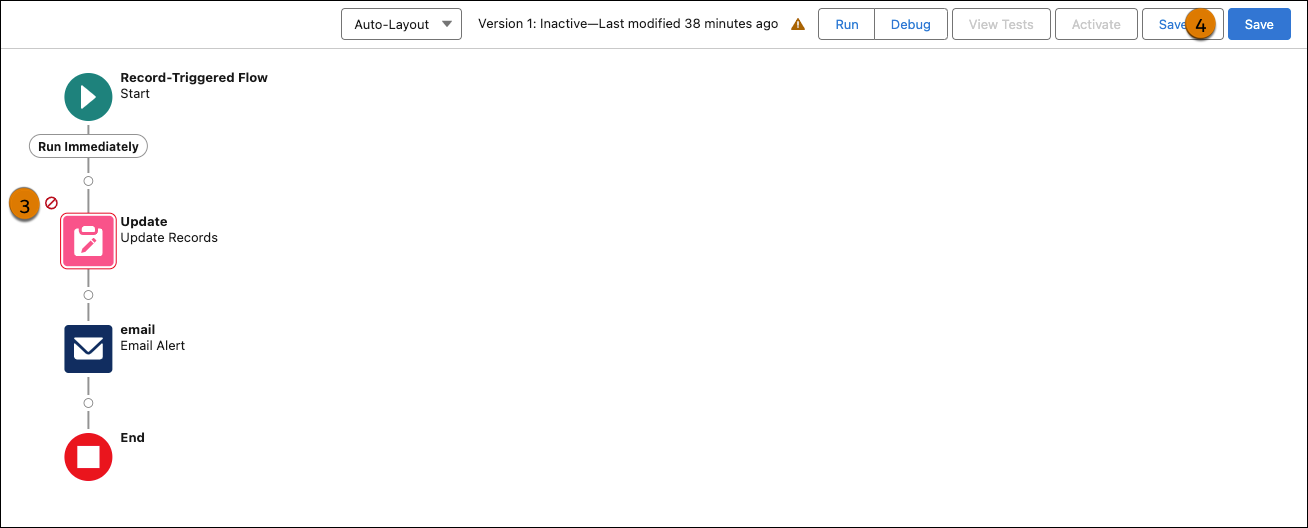
Your flow is saved, despite errors that would have previously prevented saving. Now you receive warnings instead. Click ![]() (5) to view the warnings.
(5) to view the warnings.
Find and Select Flow Resources More Easily in More Elements
With this update, Flow Builder extends the enhanced resource selection experience beyond Create Records to the Delete Records, Get Records, and Update Records elements. The improved grouping makes it easier for you to scroll through and find the resources that you need. User-friendly labeling for resources enables faster troubleshooting.
Where: This change applies to Lightning Experience and Salesforce Classic in Essentials, Professional, Enterprise, Unlimited, and Developer editions.
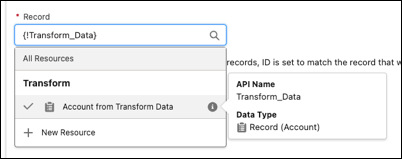
How: Open an existing flow, and then open or create an Update Records element. Click in the Record or Record Collection field.
Resource grouping now displays automatic outputs and variables with user-friendly labels under the elements in which they’re created.
To open a pill, click in a populated record, record collection, or resource field.

Your resource opens in context with a checkmark next to the selected item.
Use Text Templates to React to Changes on the Same Screen
Text Template resources that reference the output of a component on the same screen can now respond in real time to changes in the output. For example, consider a Text Template resource that references the output of a Name component on the same screen. If you include the Text Template in a Display Text component, the flow updates the displayed text each time the user changes the Name component at run time.
Where: This change applies to Lightning Experience and Salesforce Classic in Essentials, Professional, Enterprise, Performance, Unlimited, and Developer editions. It’s supported only in Lightning runtime for flows.
How: In Flow Builder, create a screen flow and use a Text Template resource on a screen that references the output of a component on the same screen. Save and run the flow.
Find the full list of Flow builder updates here - Flow Builder
Flow Management
Migrate Even More Processes with the Updated Migrate to Flow Tool
The Migrate to Flow tool now supports partial migration for most actions. At a minimum, you can partially migrate all actions except for invocable actions. The migration results identify which actions need further configuration in Flow Builder for your migration to be complete.
Where: This change applies to Lightning Experience and Salesforce Classic in Essentials, Professional, Enterprise, Performance, Unlimited, and Developer editions.
How: From Setup, in the Quick Find box, enter Migrate to Flow, and then select Migrate to Flow. Select the process that you want to convert into a flow, and click Migrate to Flow. Select the criteria that you want to migrate (1). The Migrateable column indicates if the process is partially migrateable (2). Then click Migrate to Flow. When the migration is complete, click Needs Review to see the list of actions that require additional configuration (3).

Delete Workflow Rules from Managed Packages
With this new capability, migrating to flow is even easier for independent software vendor (ISV) partners. After migrating to flow, ISVs can delete workflow rules from first-generation (1GP) and second-generation (2GP) managed packages.
Where: This change applies to Lightning Experience and Salesforce Classic in Essentials, Professional, Enterprise, Performance, Unlimited, and Developer editions.
Identify Flows Containing Email Alerts
With this update, users can see which flows use an email alert. A new category in Email Alerts Setup displays this information.
Where: This change applies to Lightning Experience and Salesforce Classic in Essentials, Professional, Enterprise, Performance, Unlimited, and Developer editions.
How: From Setup, in the Quick Find box, enter Email Alerts, and then select Email Alerts. Click the link for a specific email alert. If used in a flow, the Flows Using This Email Alert section is populated, including version, description, and object. You can also see if the flow is active.
Have Unlimited Paused and Waiting Flows
Salesforce has removed the per-org usage-based limit for paused and waiting flow interviews. The amount of Salesforce storage available to a user’s org can still limit the number of paused and waiting flow interviews stored. If more data storage is required, contact Salesforce.
Where: This change applies to Lightning Experience in Enterprise, Performance, Unlimited, and Developer editions.
Find the full list of Flow Management updates here - Flow Management
Flow Orchestration
Use Reports for Flow Orchestration Objects to Track Orchestration Usage
New custom report types include Orchestration Runs Spring ’24, Orchestration Stage Runs Spring ’24, Orchestration Step Runs Spring ’24, Orchestration Work Items Spring ’24, and Orchestration Run Logs Spring ’24. Each custom report type also has an associated sample report. For example, use Sample Report: Orchestration Runs to determine what orchestration runs have been created and the status of each run. These reports aren’t added to your org when it already contains the maximum number of defined custom report types.
Where: This change applies to Lightning Experience in Enterprise, Performance, Unlimited, and Developer editions.
Disable Default Email Notifications for Orchestration Work Items
Too many orchestration work item notifications getting emailed to users, groups, and queues? Use the new Stop Sending Orchestration Work Item Default Email Notifications process automation setting to stop sending default email notifications when work items are assigned or reassigned.
Where: This change applies to Lightning Experience in Enterprise, Performance, Unlimited, and Developer editions.
Variable Values Visible in Debugger Details
Users can see variable values in the debugger details for orchestrations.
Paused Flow Interview Limit Removed
The per-org usage-based limit for paused and waiting flow interviews has been removed and with this change users have more parallel in-progress and paused orchestration runs.
New Save-Time Warning Message
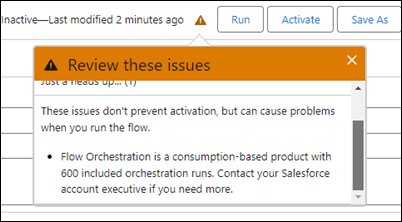
When users save an orchestration, a reminder that Flow Orchestration is a consumption-based product is displayed. The new message doesn’t affect the ability to save and activate orchestrations.
Find the full list of Flow Orchestrator updates here - Flow Orchestration
Supported Browsers and Devices
Desktop and Laptop Browsers
Salesforce supports these browsers. Make sure that your browsers are up to date. Other browsers or older versions of supported browsers aren’t guaranteed to support all features.

Tablet Browsers
Use Apple Safari on iPadOS (iOS 13.x) or later. Portrait orientation and orientation switching aren’t supported on Lightning Experience on iPad Safari. Use landscape orientation and maximize your Safari browser to full width. To avoid orientation switching, turn on the iPad rotation lock.
We support only the Salesforce mobile app for Android-based tablets.

Salesforce treats touch-enabled laptops, including Microsoft Surface and Surface Pro devices, as laptops instead of tablets. You can’t access the Salesforce mobile app on these devices. Users are redirected to the full site experience that’s enabled for them—Lightning Experience or Salesforce Classic. Only standard keyboard and mouse inputs are supported on these types of devices.
Phones
For the best experience, use the Salesforce mobile app.
Third-Party Browser Extensions and JavaScript Libraries
Before you use a third-party browser extension or JavaScript library, we recommend that you check AppExchange for browser extensions and apps from Salesforce partners or the Component Reference for base components that match your requirements.
Although some third-party browser extensions can personalize and enhance your Salesforce experience, we don’t recommend using browser extensions that manipulate the DOM. Using third-party browser extensions is at your own risk. Salesforce can’t prevent these extensions from accessing your Salesforce data, nor can we detect that there’s any attempt to access your data. Additionally:
-
Browser extensions that insert or remove elements in the DOM can interfere with the stability of Lightning Experience and lead to unexpected behavior.
-
Browser extensions that don’t follow Salesforce security standards can fail to work properly in Lightning Experience.
-
The internal DOM structure of Lightning Experience can change in a future release, and compatibility with a third-party browser extension isn’t guaranteed.
To use a third-party JavaScript library with custom Lightning components, upload it first as a static resource. Use the JavaScript library by loading it in the component depending on which model that you're using.
-
Lightning Web Components: Load a third-party JavaScript library via
lightning/platformResourceLoader -
Aura Components: Load a third-party JavaScript library via
ltng/require
MFA Is Turned On by Default Starting April 2024
To prevent unauthorized access to Salesforce accounts, multi-factor authentication (MFA) is required when users log in. To help customers with this contractual requirement, Salesforce is making MFA a default part of the direct login process for production orgs. This change applies to production orgs created on or after April 8, 2024. It also applies to any existing production org that wasn’t included in one of the MFA auto-enablement phases that occurred between Spring ’23 and Spring ’24. Sandbox orgs aren’t affected. Orgs that are in a trial period aren’t affected until they’re converted to a subscription.
Where: This change applies to Lightning Experience, Salesforce Classic, and all Salesforce mobile apps in all editions.
When: This change goes into effect on April 8, 2024.
Why: On their own, usernames and passwords no longer provide sufficient protection against cyberattacks. MFA is one of the simplest, most effective ways to prevent unauthorized account access and safeguard your data and your customers’ data. Salesforce requires MFA to help protect against threats like phishing attacks, credential stuffing, and unauthorized account access. To learn more about the value of MFA and how it works, watch this short video.
How: When MFA is turned on for an org, users must verify their identity with a username and password, followed by a separate verification method. Verification method options include authenticator apps, security keys, and built-in authenticators. The first time each user logs in to their org, they’re guided through the steps to register a method.
There’s a 30-day grace period for the org during which users can log in without MFA if they’re not ready to set up a verification method. If needed, a Salesforce admin can temporarily turn off MFA by deselecting the Require multi-factor authentication (MFA) for all direct UI logins to your Salesforce org setting on the Identity Verification page in Setup. But keep in mind that MFA is contractually required, so re-enable it as soon as possible.
Salesforce for Outlook Is Being Retired in June 2024
Full product retirement for Salesforce for Outlook is scheduled for June 2024. For the latest integration with Microsoft Outlook, we recommend moving to our next-generation products, the Outlook integration and Einstein Activity Capture. These products replace Salesforce for Outlook features and give users new capabilities. We continue to introduce enhancements for these products every release.
Where: This change applies to Lightning Experience and Salesforce Classic in Contact Manager, Group, Essentials, Professional, Enterprise, Performance, Unlimited, and Developer editions.
How: When Salesforce for Outlook is retired, it will no longer sync contacts, events, or tasks. Admins and users also lose access to Salesforce for Outlook features, such as the side panel.
If your version of Salesforce for Outlook looks like this, then we recommend upgrading to the latest version, Salesforce Outlook Integration, prior to June 2024.

If your version of Salesforce Outlook Integration looks like this, with the blue cloud logo in the ribbon menu, then you are using the most recent version, and no action is needed.

Ant Migration Tool End of Life
The Ant Migration Tool is retired with Spring ’24. The tool continues to function for future API versions but isn’t updated with new functionality and isn’t supported. To manage metadata changes, switch to Salesforce CLI for a modern, supported developer experience.
The Ant Migration Tool is a developer tool. For developer tool policies, review Program Terms for the Salesforce Developers Program.


