

List views are a great way to sort, prioritize, and analyze the records that are most important to you. If you need to start with the basics on List Views, check out this article. Below, we'll take a peek at the powerful options for creating, editing, and consuming your data from List Views.
Please remember, only edit YOUR List Views. It is possible to edit the firm wide list views, so be sure to create and edit your own views only.
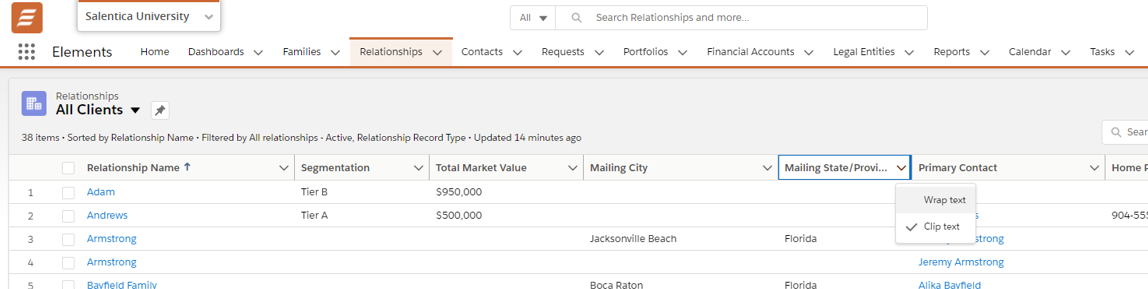
By selecting an Object from the Navigation Bar, you will be presented with a List View.

- Click
 to access your list views.
 - Click
 to pin a list view. A pinned list is the default list view for that object. A
  icon indicates a pinned list. To pin a different list, select a different list view and pin it instead.
 - Click
 to access list view actions, including creating, renaming, cloning, and sharing them. You can also choose which fields to show in a list and editing filters that you’ve applied.
 - Click
 to toggle between displaying lists in the standard table view (
  ) , or you can also use split view (
  ) to see all of your records on the left side of the page, plus the details for a selected record on the right.
 - Click
 to get a fresh view of a list more quickly than doing a full page reload.
 - Click
 to update fields in your list. You move to the first editable field in the list. Edited fields are highlighted in yellow to remind you to save your changes.
 - Click
 to transform list data into simple and easy-to-understand pictures that show things like percentages, totals per relationship, and other useful information.
 - Click
 to narrow or expand the records that appear in a list view by adding, modifying, or removing filters.
Important Things to Note about a Pinned List View
-
Pinned lists are per user
-
Pinned lists don’t sync between browsers
-
Pinned lists are stored in your Browser’s Cache so if you clear your browser's cache, the pin list returns to the default view
It’s easy to wrap text in list view columns. Select Wrap text or Clip text at the top of the list view column.
Create a New List View
In Elements, create a list from the List View Controls menu (  ). Select New to start from scratch (or use Clone to create a duplicate of the current list).

Filtering Makes Perfect
Filters are at the heart of crafting list views that show you just the records that meet your criteria. Applying filters is an automatic part of the process when creating list views. You can also modify filters for an existing list view by clicking the  icon which will open the filter pane next to the list view.

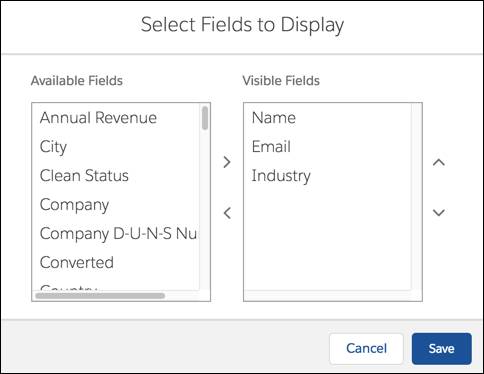
Pick the Columns That Appear in List Views
Don’t stop with filters. You can also choose the fields, and in which order the fields that appear as columns in list views. In Elements, make these decisions by clicking Select Fields to Display in the List View Controls menu ( ).
Edit Records on the Fly
You can edit records from list views, which will bring an editable popup. Click ![]() then Edit to get the Edit record popup.
then Edit to get the Edit record popup.

Inline Editing in List Views
Simply click an editable field, type data right into the field, and press Return. Update as many fields as you want. Quickly breeze around a list using the tab key and arrow keys on your keyboard. Click Save once when you’re finished.

Bulk Inline Editing
Need to make the same update to multiple records? Here’s another feature of Elements: edit multiple fields on a list view at the same time. For example: If you've completed multiple tasks in a single day, and need to mark them all as completed:
In a list view, select all of the tasks you completed. Edit just one of the record’s Status fields, select Completed then select to apply the change to all of the tasks. Save all your changes at once.

Inline editing in list views is already enabled on Elements. Here are some pointers about how inline editing works.
Notes about Bulk Inline Editing
Not all fields on records in a list view or multiline layout view can be inline edited. To find out whether a field supports inline editing, hover over it and look for the pencil . Non-editable cells have a lock . When making inline edits in a list view, required fields can’t be left blank.
- If a list view or multiline view contains more than one record type, it can’t be inline edited. To enable inline editing, edit your list view filters so it contains only one record type.
- Inline edit doesn’t apply to components in the small region.
- You can inline edit in Recently Viewed or Team list views that are predefined to contain only one record type. You can also edit tasks on the tasks object home page even though they’re not in a list view.
- You can't inline edit in split view.
Uneditable Fields using List Views
- Fields that can't be edited on the record, like Record ID or Created Date
- Compound fields like Name. To inline edit names, use the First Name and Last Name fields.
- Controlling or dependent picklists
- Custom date/time fields
- Encrypted text fields
- If your list view includes multiple record types, no fields are inline editable. (IMPORTANT FACT)
- Formula fields
- Standard fields of type date/time, auto number, rollup summary, record type, master-detail, long text area, rich text, checkbox, or hierarchy
- Fields that aren't on the page layout
Elements List Views: Split View
Split View is ideal for anyone who works with lists of records, such as tasks. Split View is a great time-saver, reducing the need to navigate back and forth between records or tabs.
1. With your list view selected, select Display As menu () > Split View ()

2. Select a record from your list view to view the record on the right-hand side
3. You can edit a record without leaving your list view

4. Collapse or open the list view at any time by clicking the arrow

Need to limit who can make edits to public List Views? Check out this article Lock Access to Edit List Views.

